
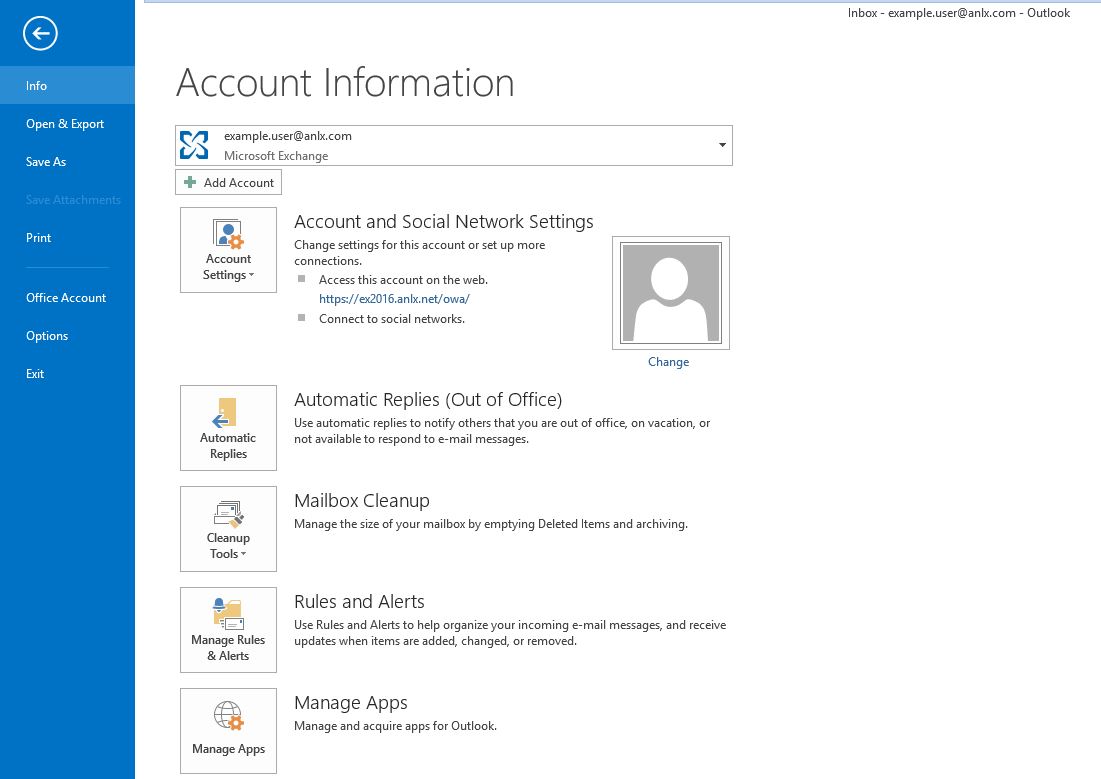
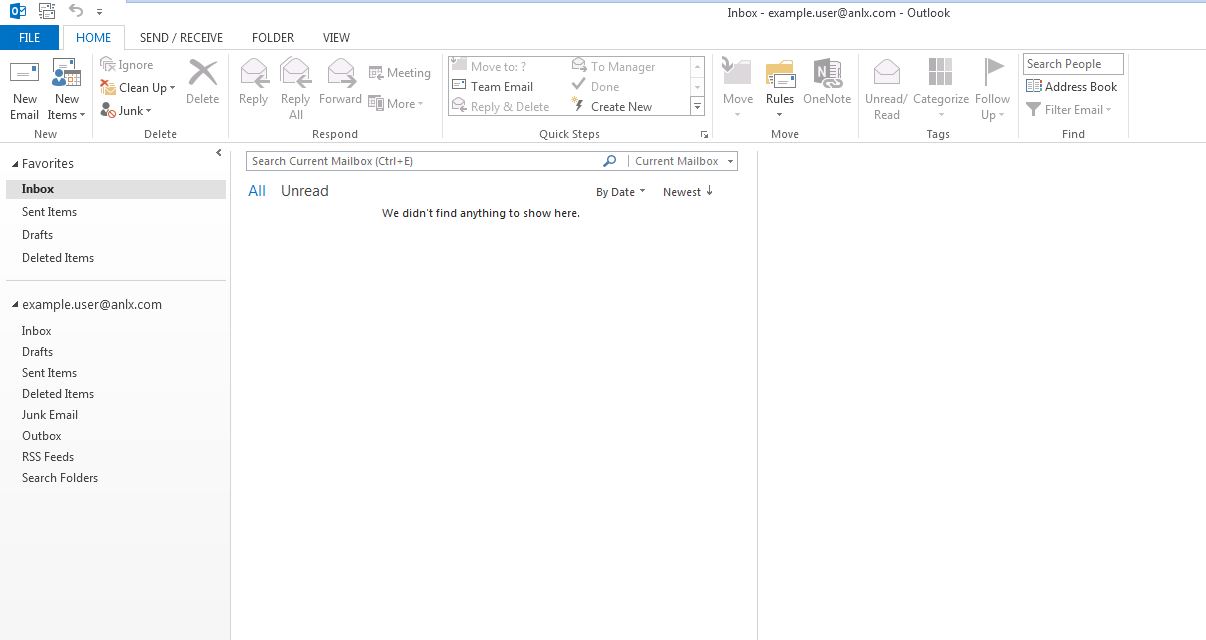
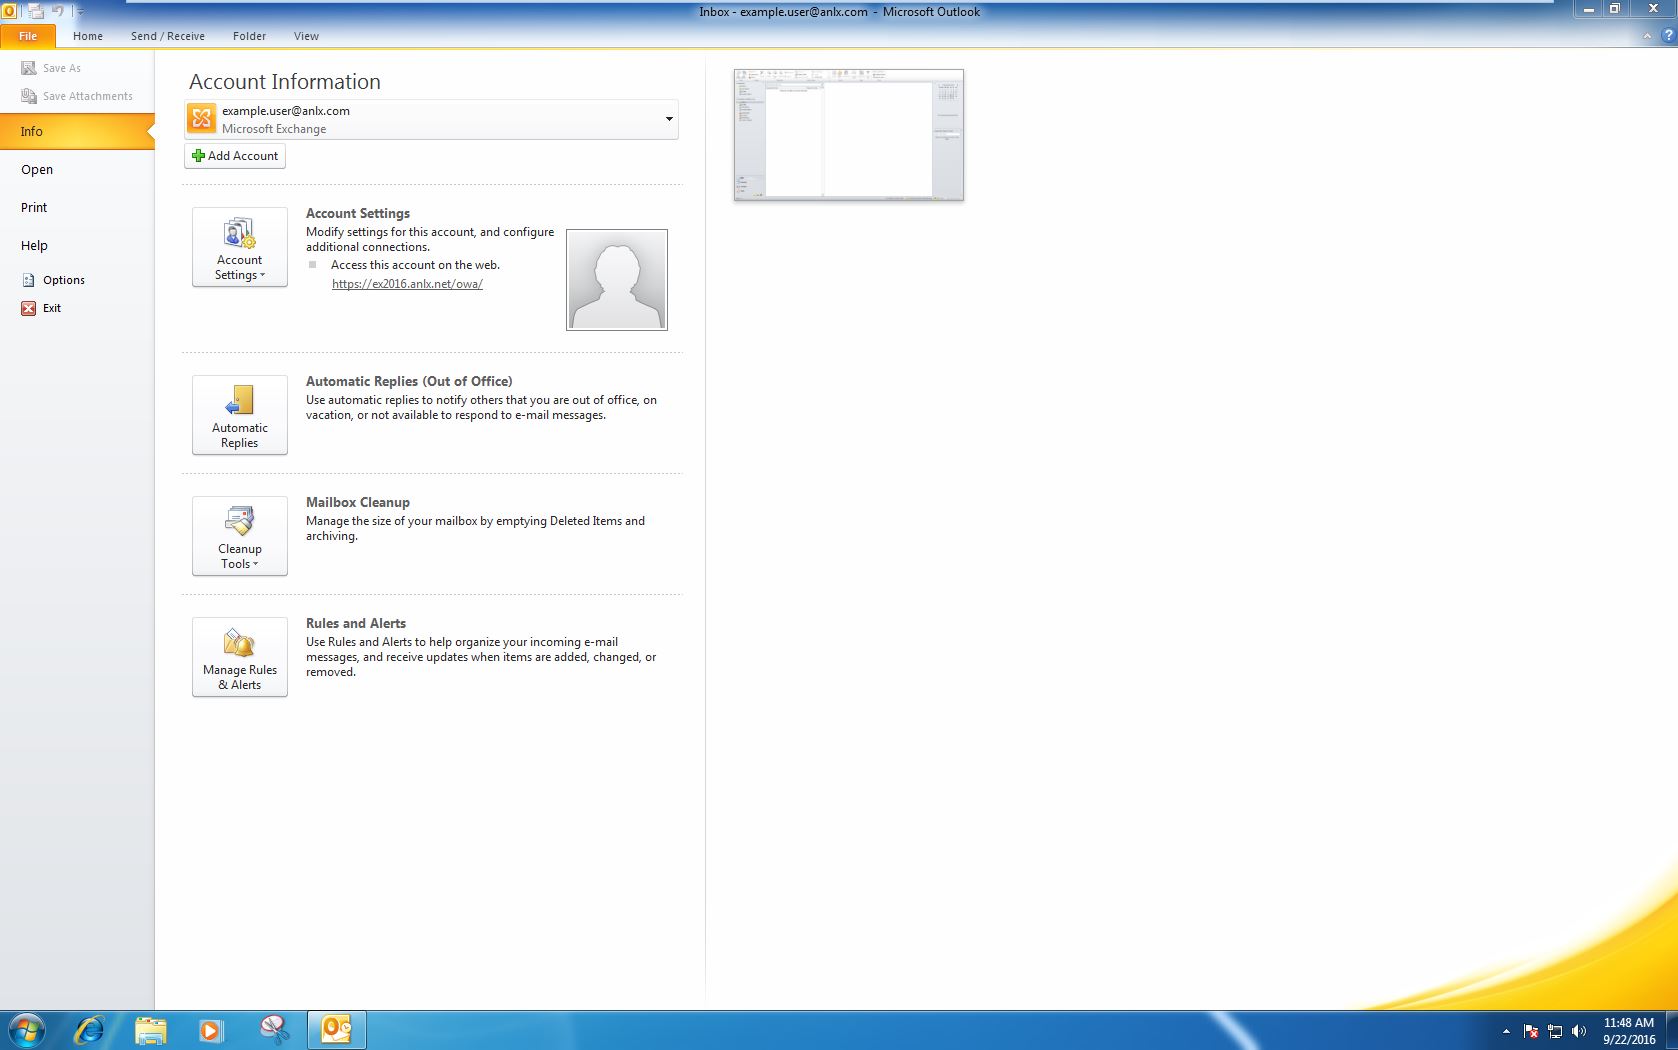
Outlook 2013 (IMAP/ POP3)
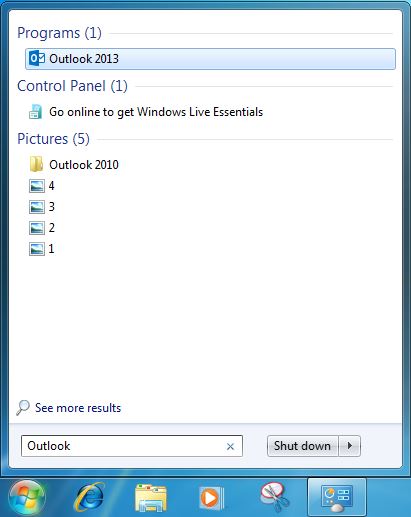
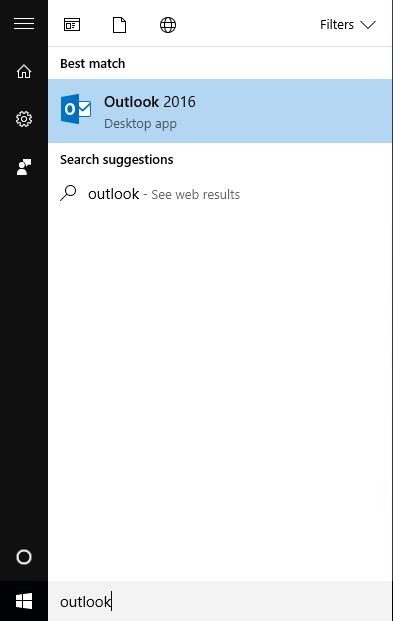
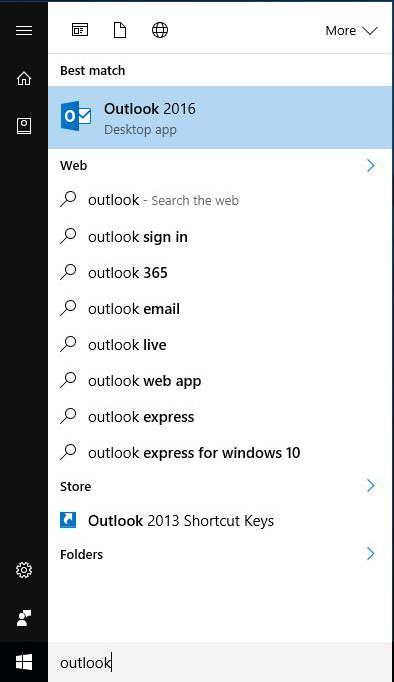
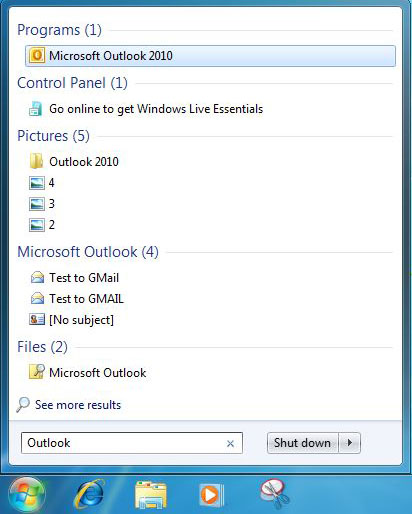
1. First open the start menu, by clicking the windows icon in the bottom left hand corner on the screen, and type “Outlook”

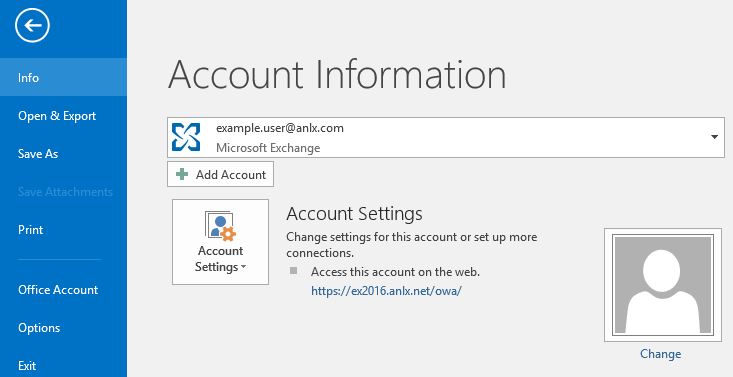
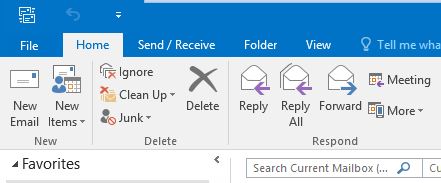
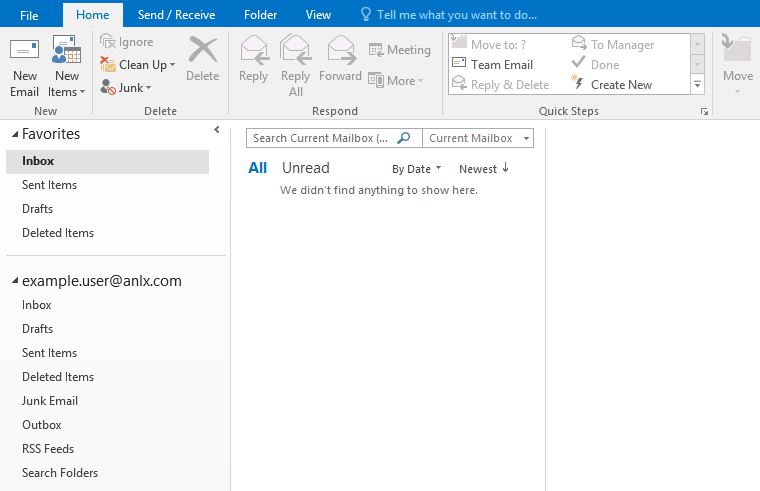
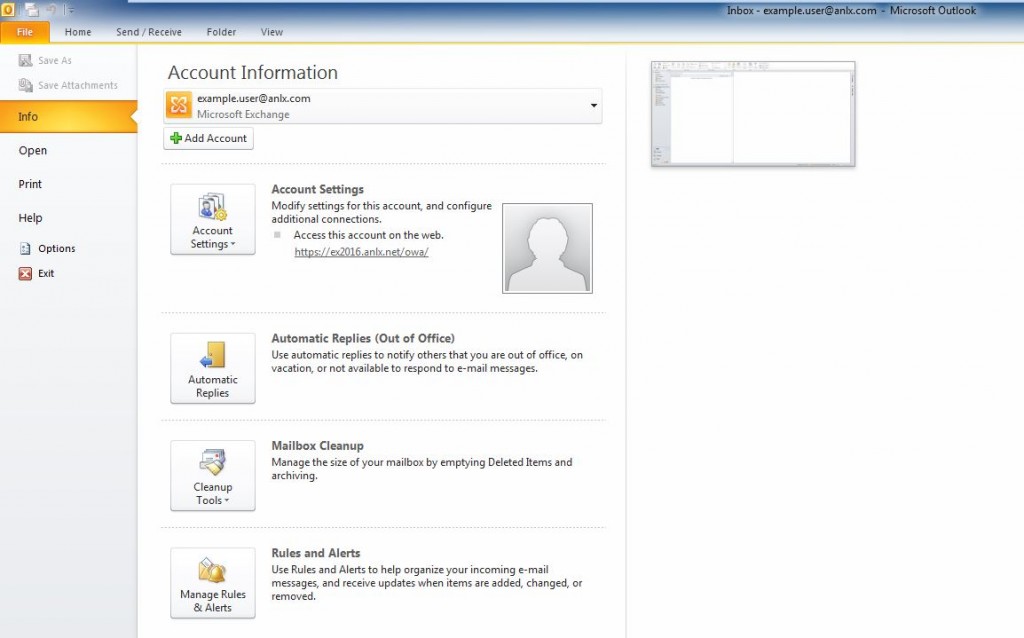
2. In Outlook, at the top left, click “File”, then under account infomation, click “Add Account”
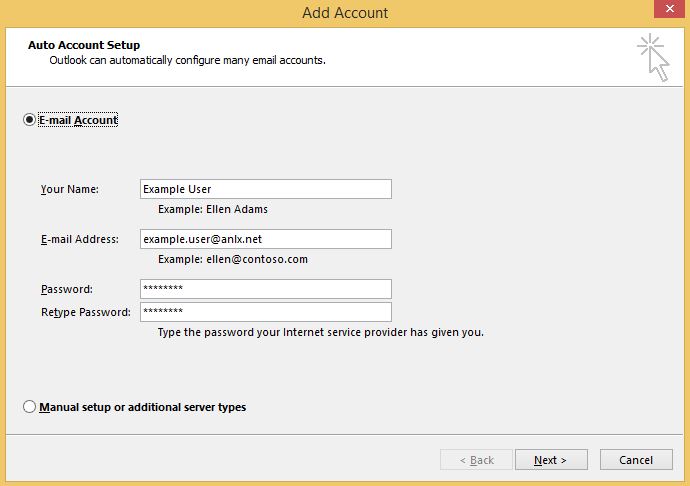
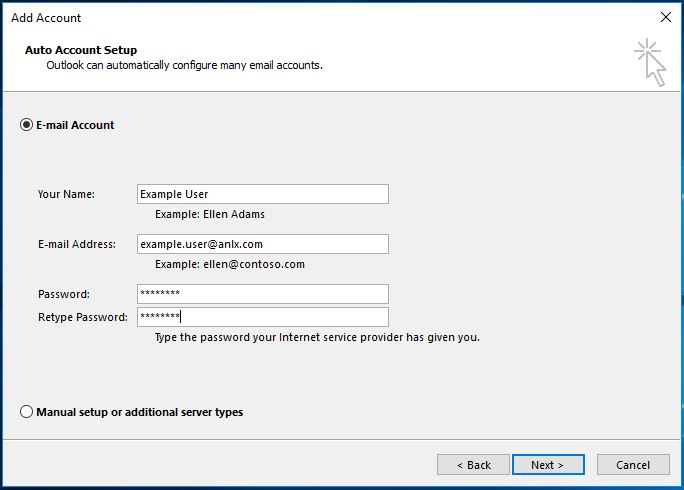
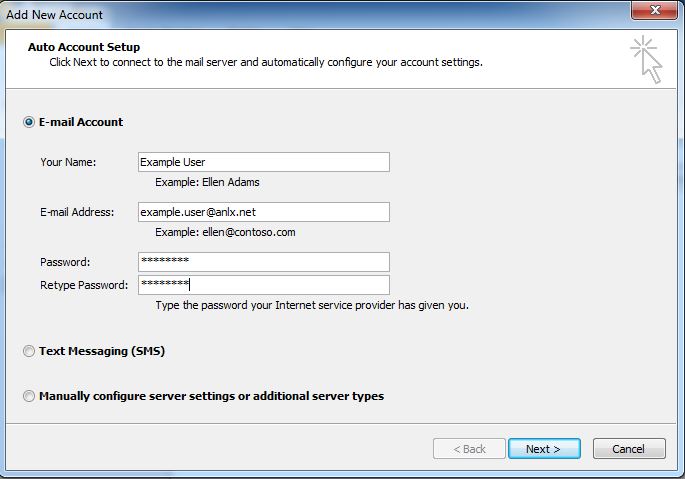
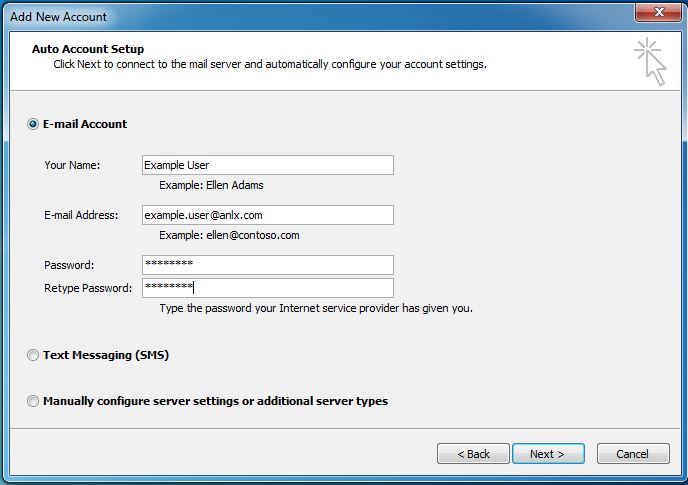
4. Now enter the follwing infomation
Your Name
Your Email Adress
Password
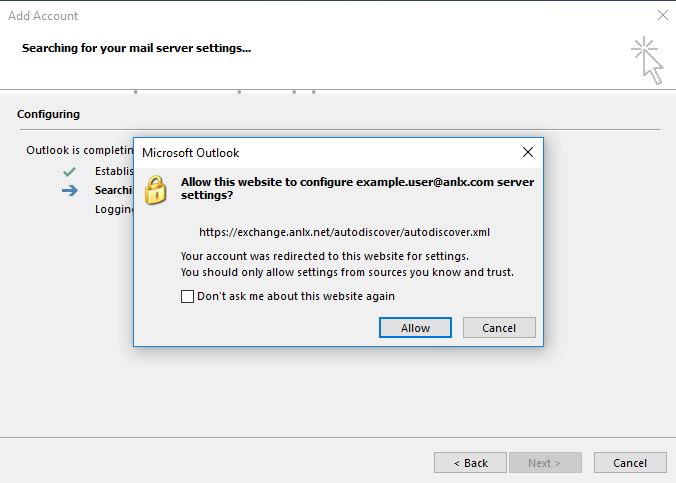
Click Next
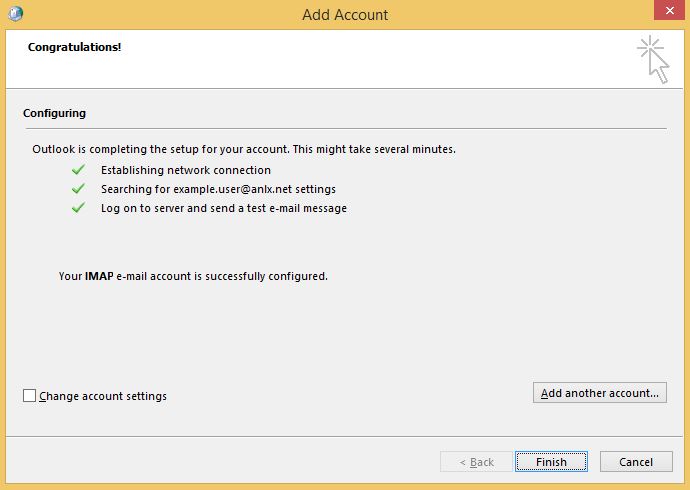
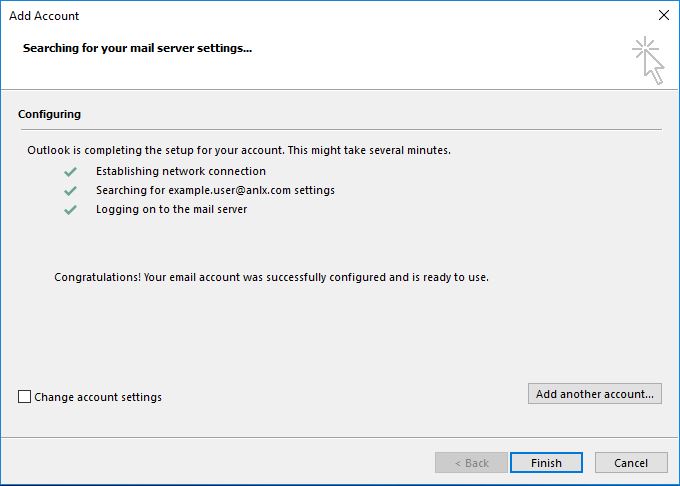
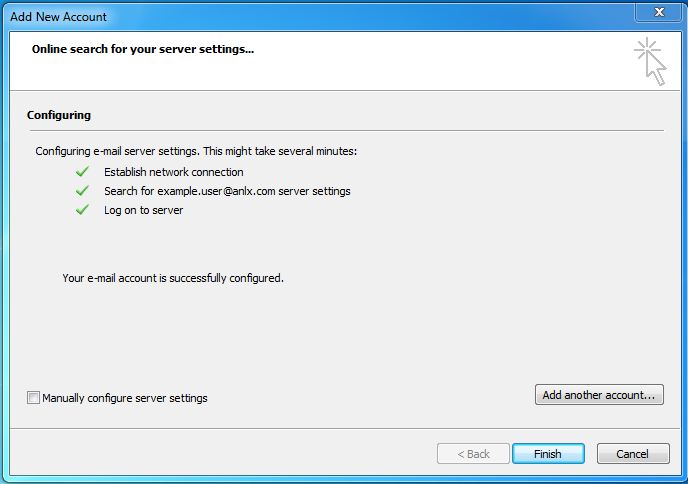
Click Finish
Outlook 2013
1.Open the start menu by clicking the windows icon in the bottom left corner, and type “Outlook”
2.Click “File” which is in the top left corner.
3. Click “Add Account” underneath “Account Information”

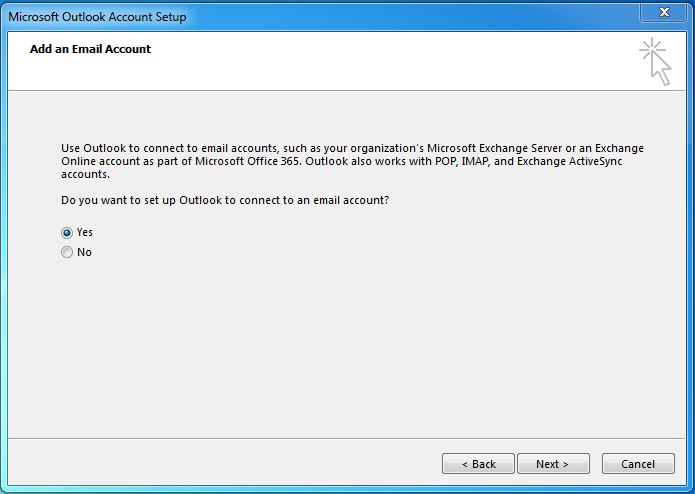
4. Make sure “Yes” is selected and then click “Next”
5. Now fill in the fields with the following details:
Your Name
E-Mail Address
Password
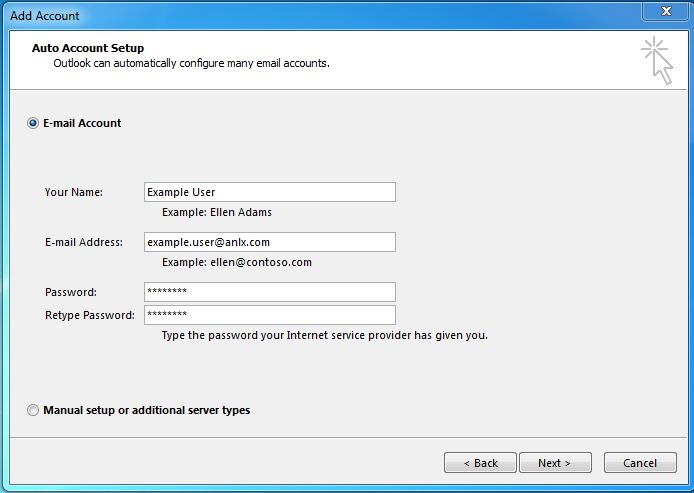
Then click “Next” and “Finish”
Outlook 2016 (POP3)
1. First open the start menu, by clicking the windows icon in the bottom left hand corner on the screen, and type “Outlook”
2. In Outlook, at the top left, click “File”, then under account infomation, click “Add Account”

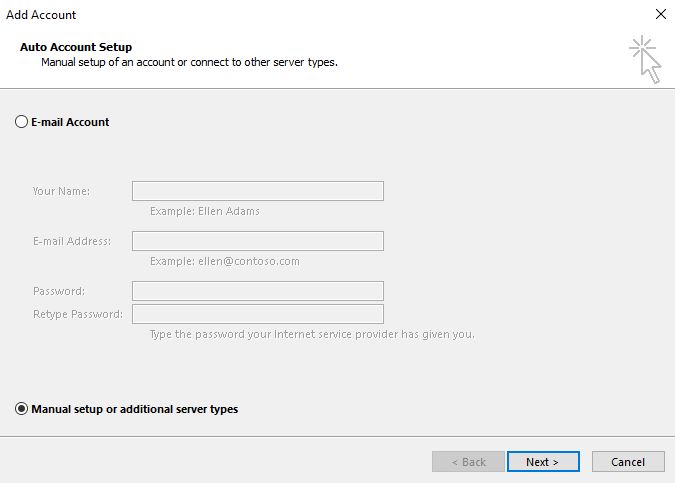
3. Now select “Manual setup or additional server types” and click next

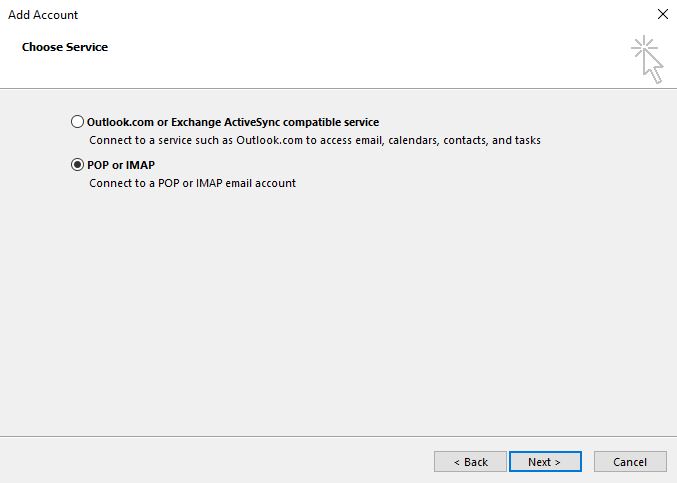
4. Select “POP or IMAP”

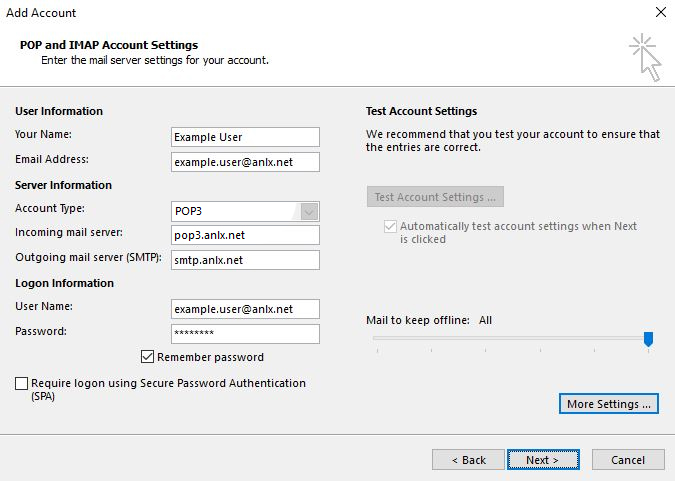
5. Now enter the following infomation into the fields:
Your Name
Your Email Address
Account Type: POP3
Imcoming Mail Server: pop3.anlx.net
Outgoing Mail Server: smtp.anlx.net
User Name: Your Email Adress
Password
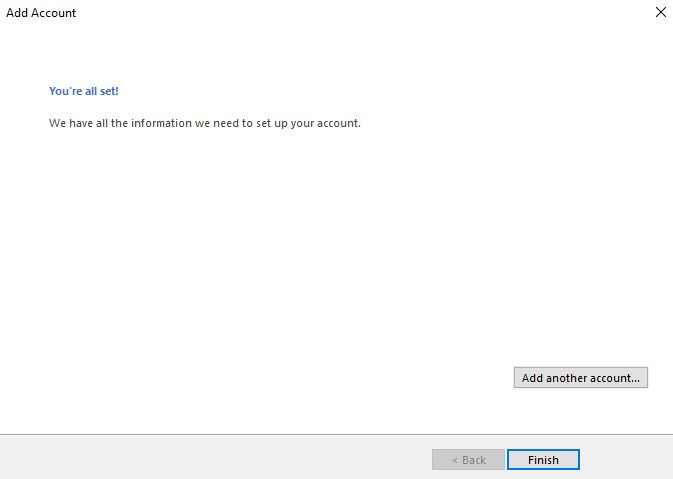
Click ‘Next’
6. Click ‘Finish’
Outlook 2016 (IMAP)
1. First open the start menu, by clicking the windows icon in the bottom left hand corner on the screen, and type “Outlook”

2. In Outlook, at the top left, click “File”, then under account infomation, click “Add Account”

3. Now select “Manual setup or additional server types” and click next
4. Select “POP or IMAP”
5. Now enter the following infomation into the fields:
Your Name
Your Email Address
Acount Type: IMAP
Incoming Mail Server: imap.anlx.net
Outgoing Mail Server: smtp.anlx.net
User Name: your email
Password
Click ‘Next’

6. Click Finish

Outlook 2016
1.Open the start menu by clicking the windows icon in the bottom left Corner of the screen and type “Outlook”
2. click “File” on the top left hand corner of the screen
3. click the “Add Account” button underneath Account Information

4.Click the “E-mail Account” box and fill on the required fields:
Your Name
Email Address
Password
5. click “allow”
6. click “Finish” to complete the setup
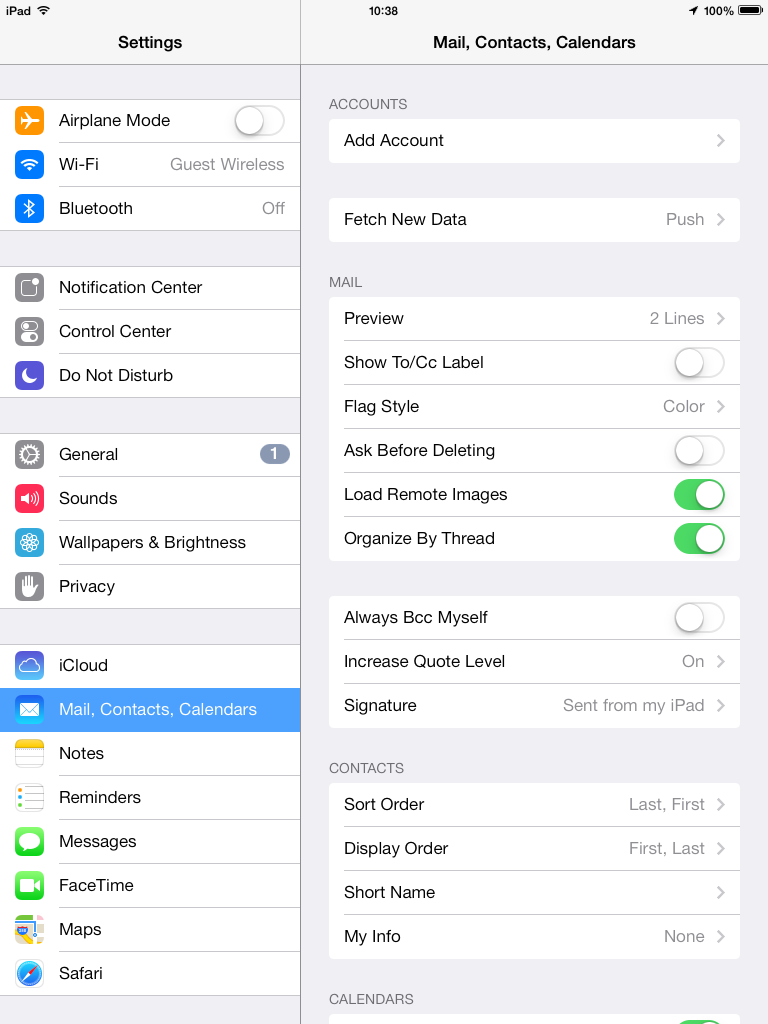
Outlook 2010 (IMAP/ POP3)
1. First open the start menu, by clicking the windows icon in the bottom left hand corner on the screen, and type “Outlook”

2. In Outlook, at the top left, click “File”
3. Under account infomation, click “Add Account”
4. Now enter the follwing infomation
Your Name
Your Email Adress
Password
Click Next
Click Finish

Outlook 2010
1.Open the start menu, using the small windows icon in the bottom left hand corner, and type “outlook”. Then push the enter key if you see this icon
2. Click the “file” button in the very top left, then “add account”.
3. Now fill in your info into the fields:
Your name: your first and last name
Email Address: your email address
Password: your password
Then select the next button
4. Click “finish” and then you’re done
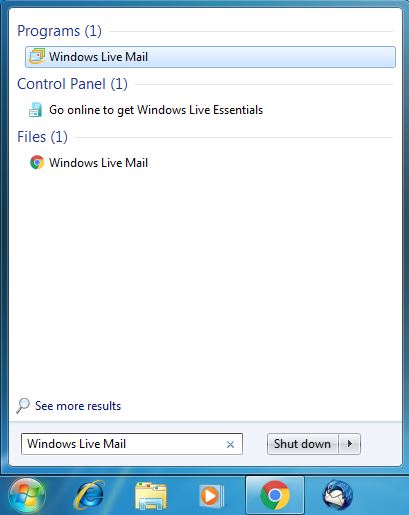
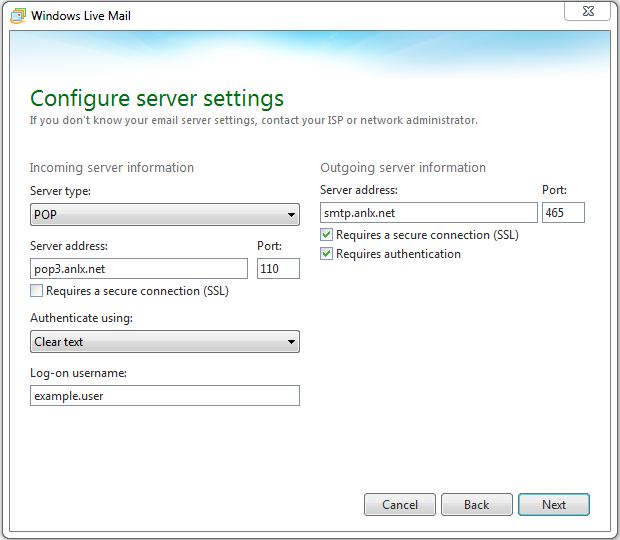
Windows Live Mail
1.First open the start menu by clicking the windows icon in the bottom left hand corner of the screen, and type “Windows Live Mail”
2.From windows live mail click on the top left drop down button.
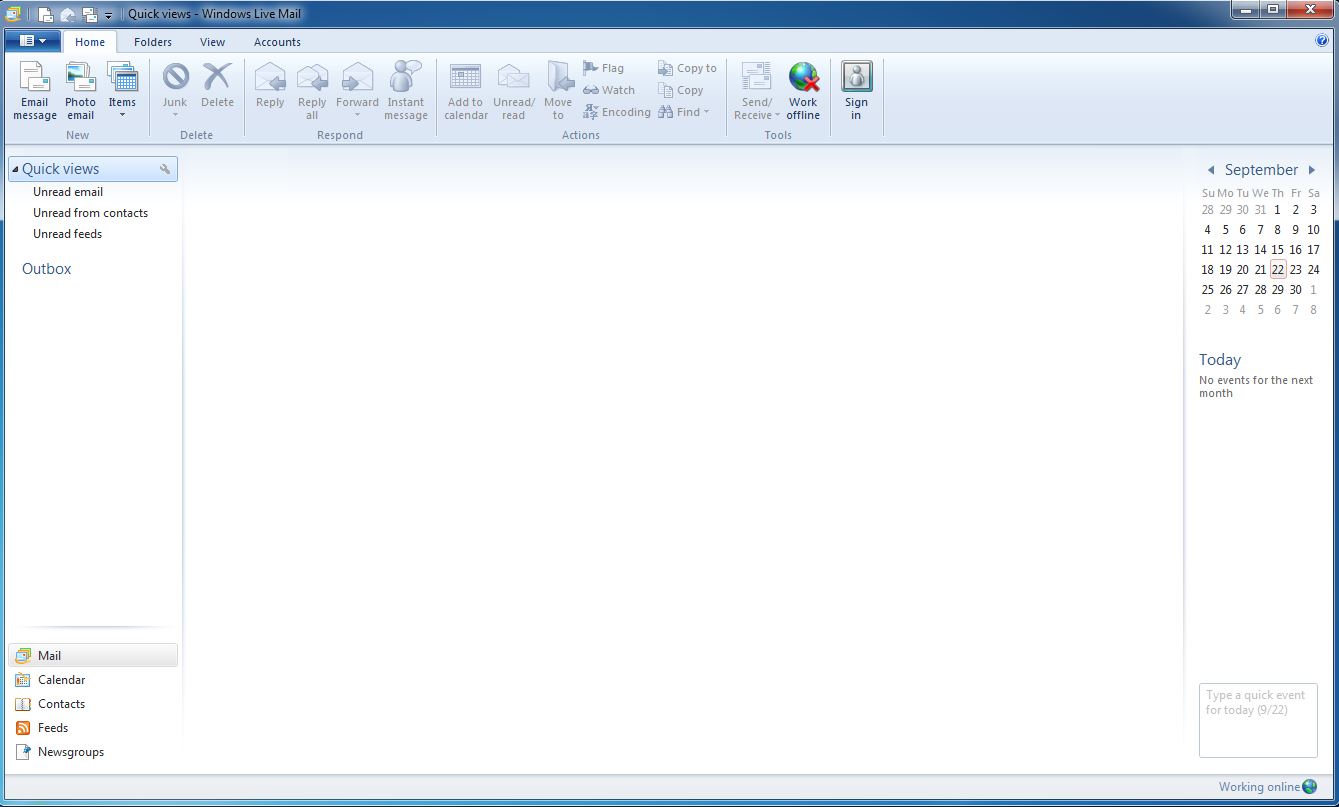
3. Now select the “Options” tab and then go to “Email accounts”

4. Now click on the “Add” button
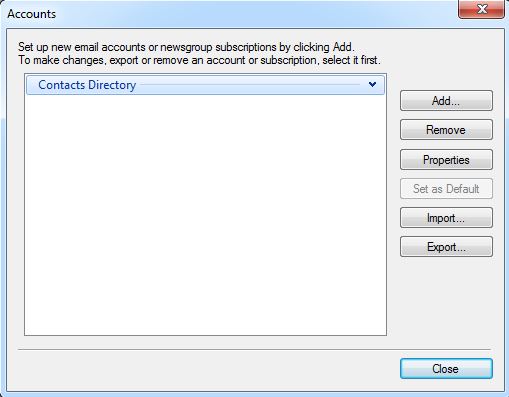
5. “Email Account”
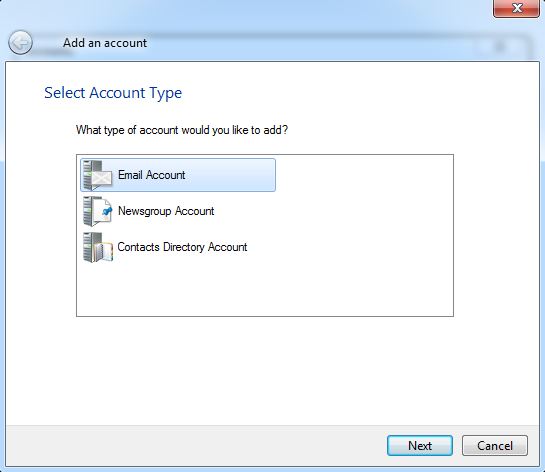
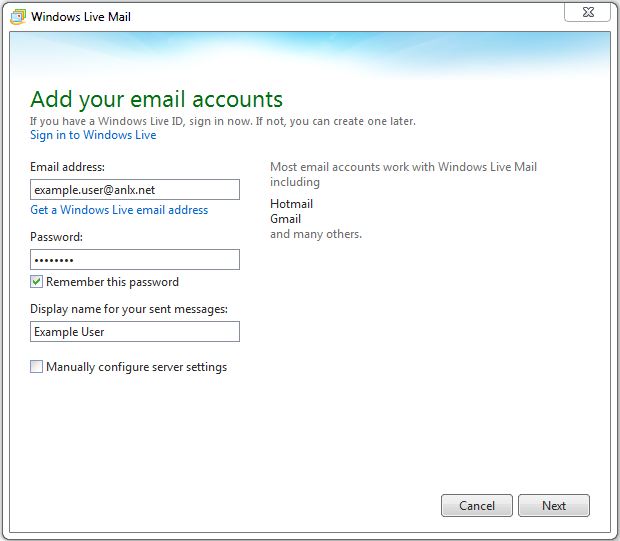
6. Now type in the required intimation into the fields:
Email Address: your email
Password: your password
Display name for your sent messages: your name
7. Incoming server information
Server type: POP
Server address: pop3.anlx.net
Port: 110
Log-on username: firstname.lastname
Outgoing server information
Server address: smtp.anlx.net
Port: 465
Make sure both “Requires a secure connection (SSL)”, and “Requires authentication” are both ticked
Then click “Next” and “Finish” to complete the setup.
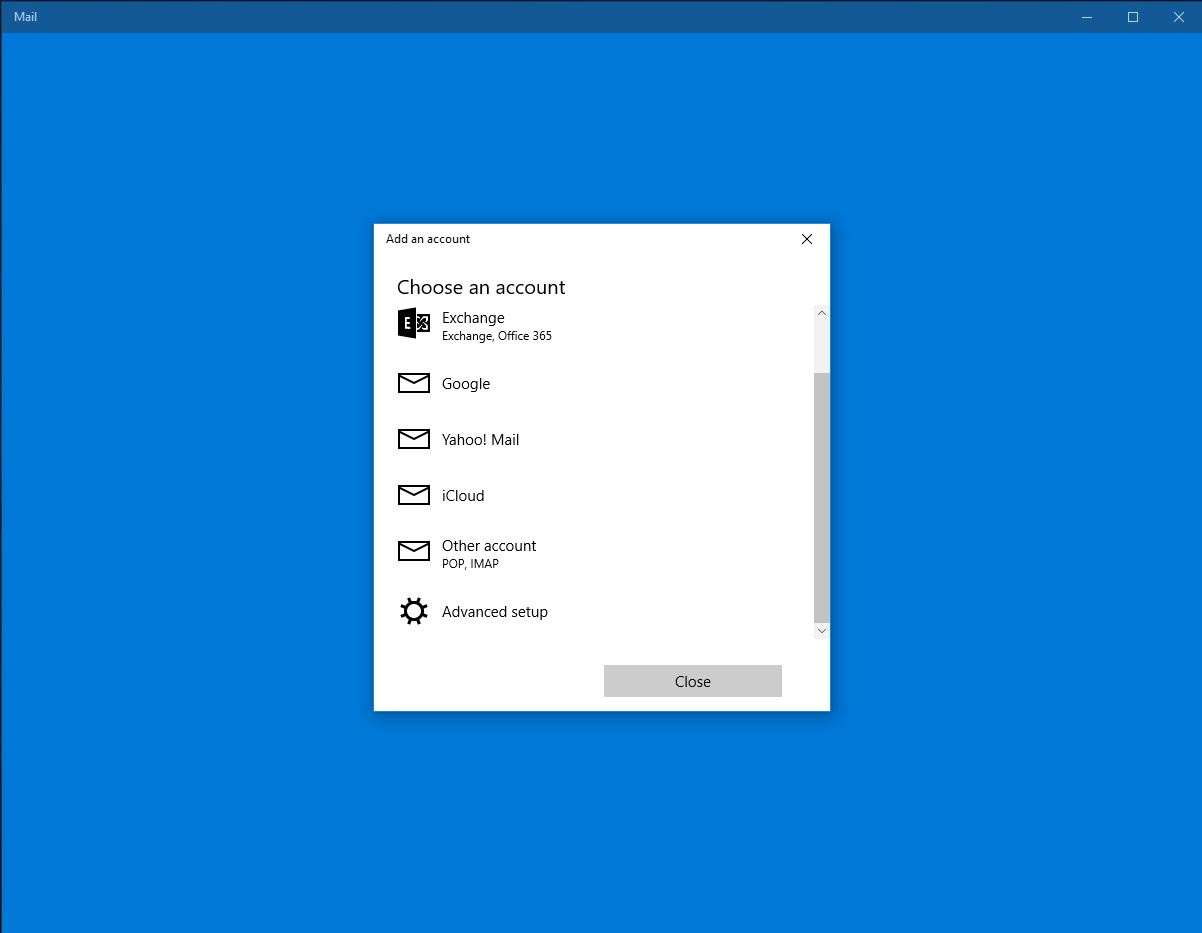
Windows 10 Mail (POP3)
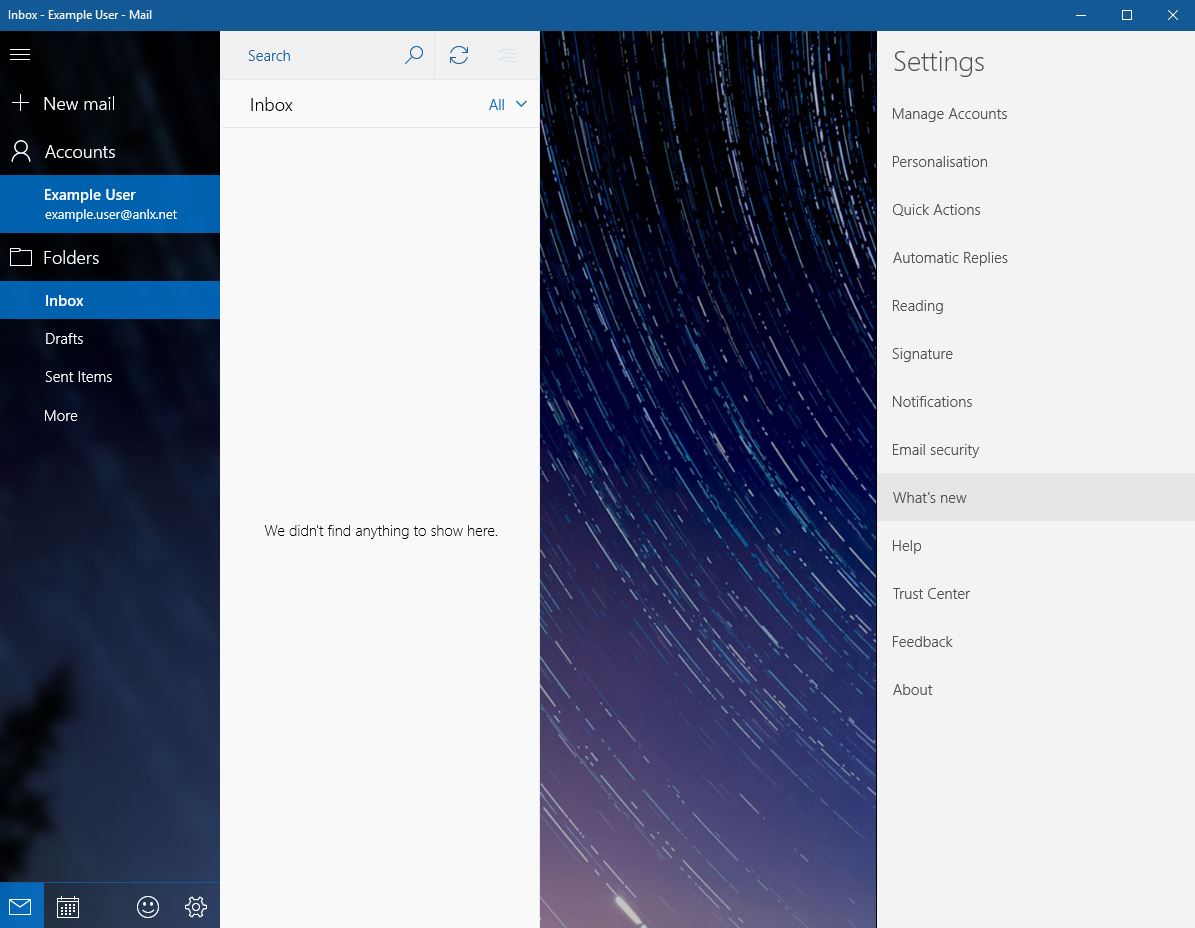
1. To open Mail, first click the windows icon in the bottom left hand corner to bring up the start menu, and type “Mail”
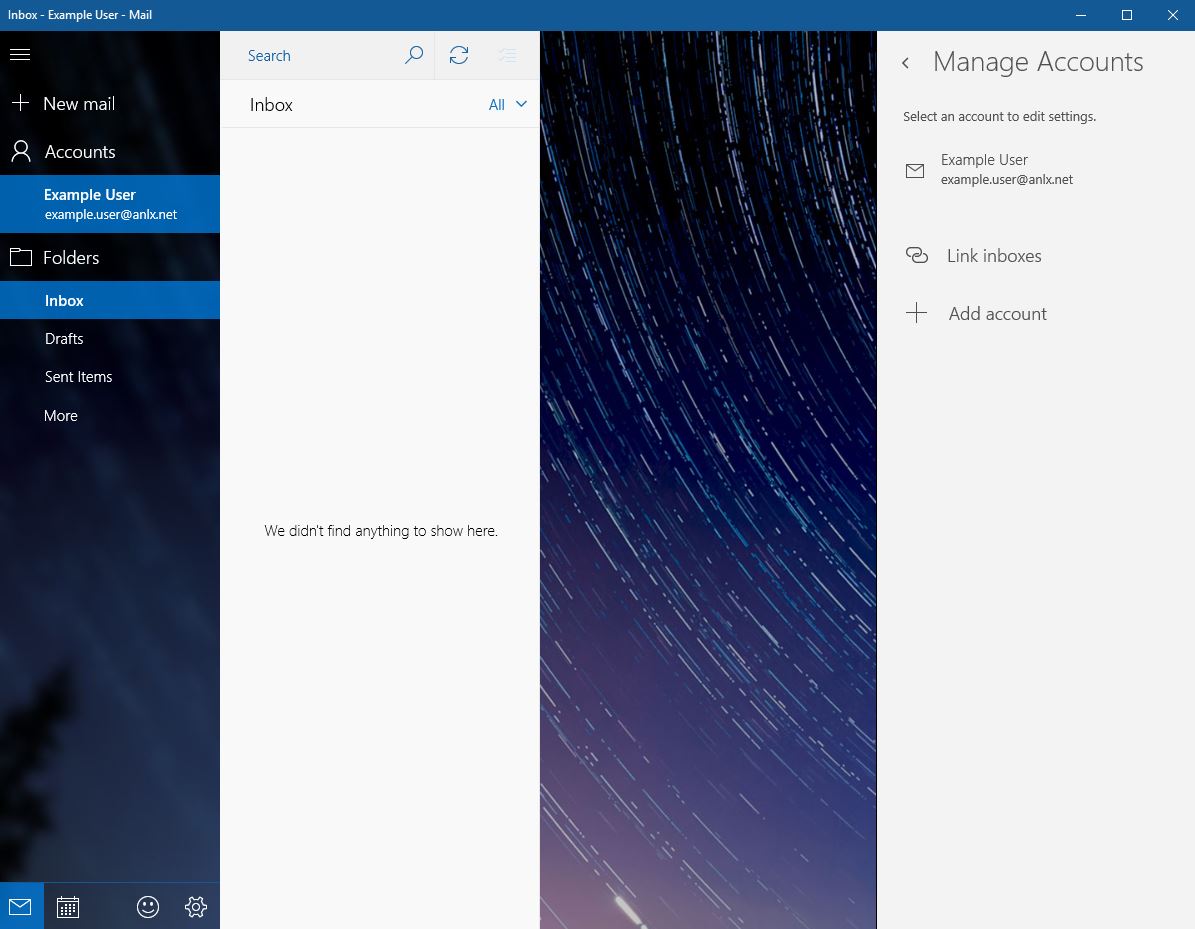
2. In the mail app click the settings icon on the bottom left of the screen.

3. Click “Manage accounts”
4. Now click on “Add Account”
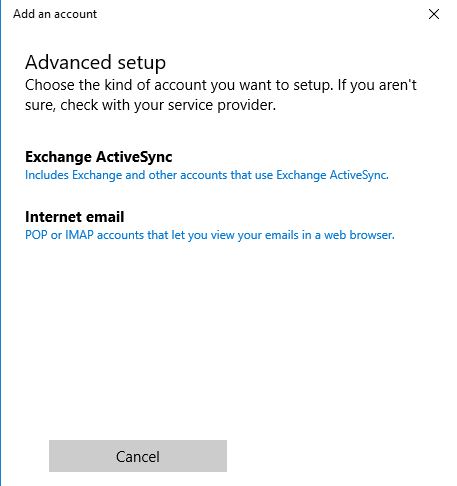
5. Then “Other Account”
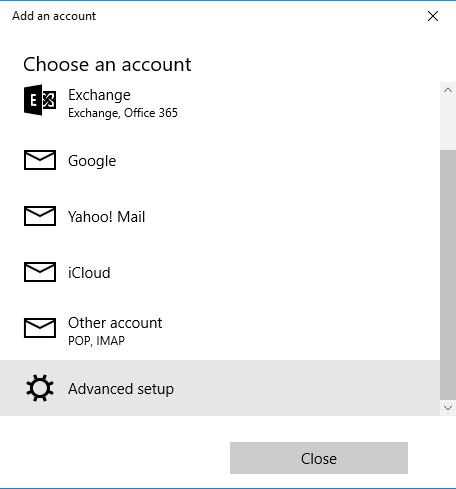
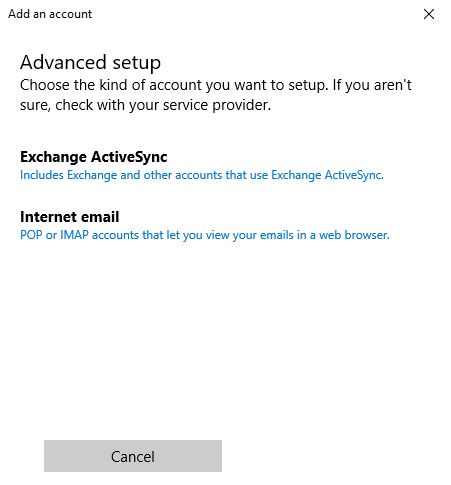
6. Now pick the “Internet email” option
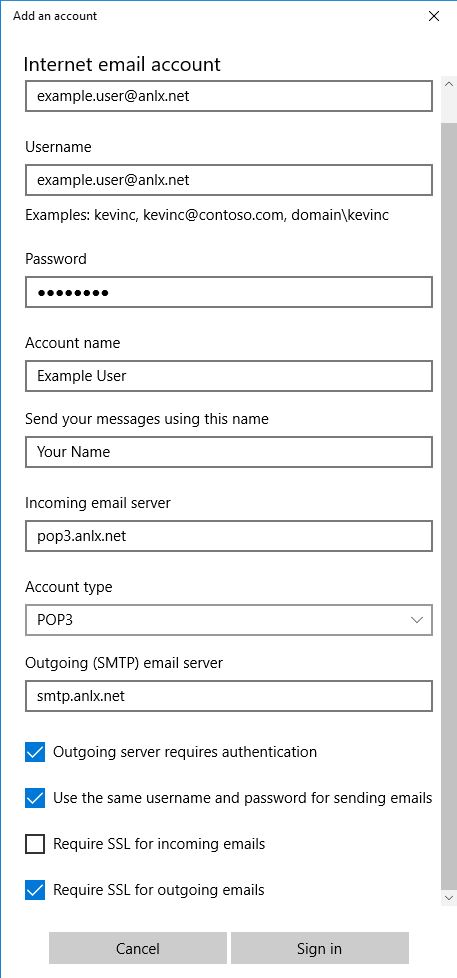
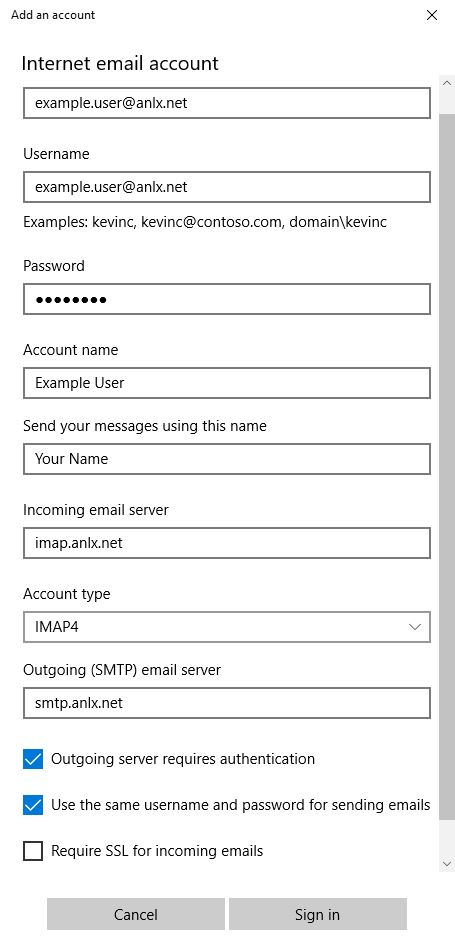
7. Finally fill in the following fields with the required information:
Internet Email Account: your email
Username: your email
Password: your password
Account name: something you will recognise as this account
Send your messages using this name: your name
Incoming email server: pop3.anlx.net
Account Type: POP3
Outgoing (SMTP) email server: smtp.anlx.net
Make sure the following boxes are ticked: Outgoing server requires authentication/ use the same username and password for sending emails/ Require SSL for outgoing emails
Windows 10 Mail (IMAP)
1.First open the start menu by clicking the windows icon in the bottom hand left corner of the screen, and type “Mail”, then press enter or click on the mail icon

2. Then, in the bottom left corner, click the small settings icon.

3.Then in mail settings, click “Manage accounts”

4.Now click “Add account”

5. Click “Other Account”
6. Now select “Internet email”
7. Now fill in the following fields with this information:
Email address: your email
Username: your email
Password: your password
Account name: something you will recognise as this account
Send your messages using this name: your name
Incoming email server: imap.anlx.net
Account Type: IMAP4
Outgoing (SMTP) email server: smtp.anlx.net
Make sure theses boxes are ticked: Outgoing server requires authentication/ Use the same username and password for sending emails
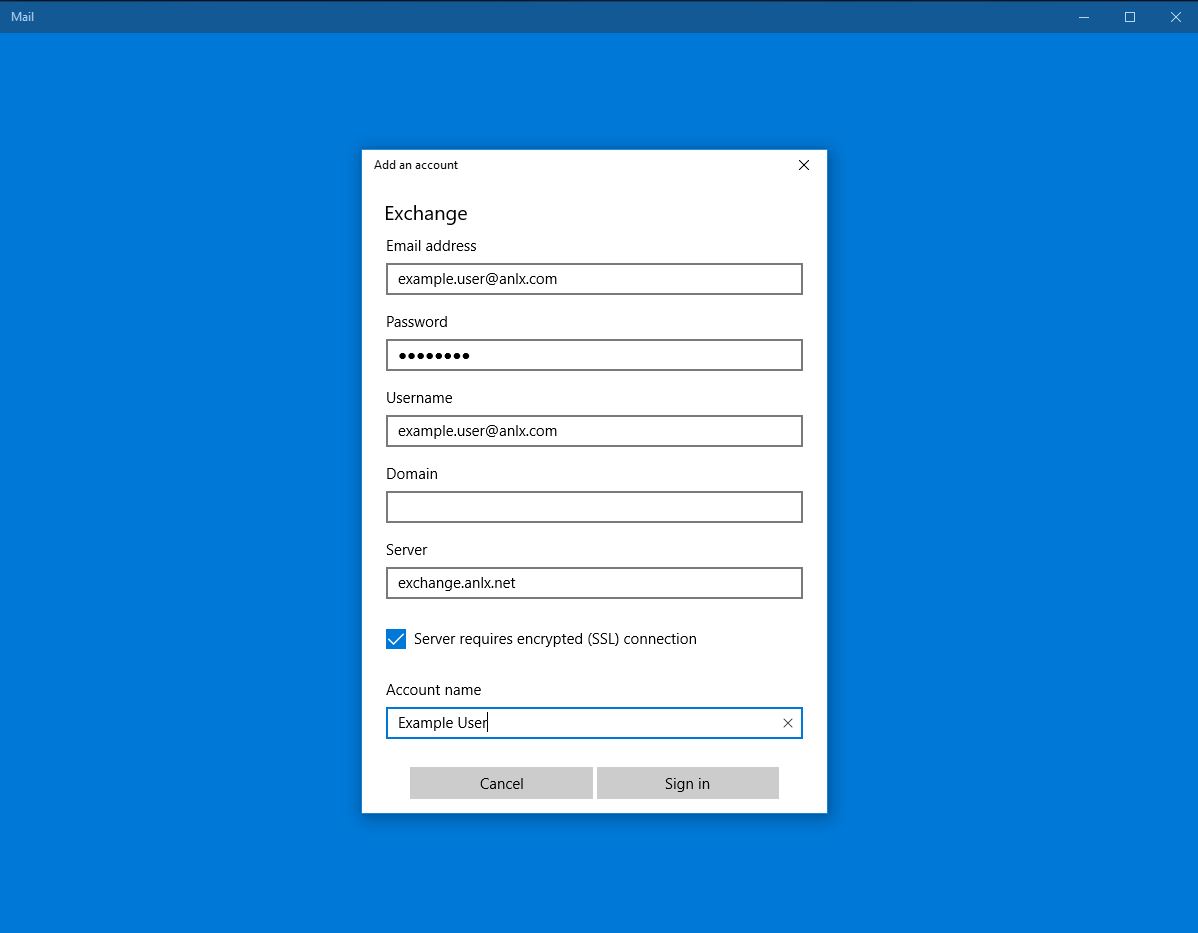
Windows 10 Mail (Exchange)
1. First open the start menu by clicking the windows icon in the bottom left corner of the screen and type “Mail”

2. Now click the little settings icon in the bottom left hand corner
3. In the settings tab, click on “Manage Account”

4. In the Manage account tab, select “Add Account”

5. Click “Add Account”
6. Now click “Exchange”
7. Now click “Exchange ActiveSync”
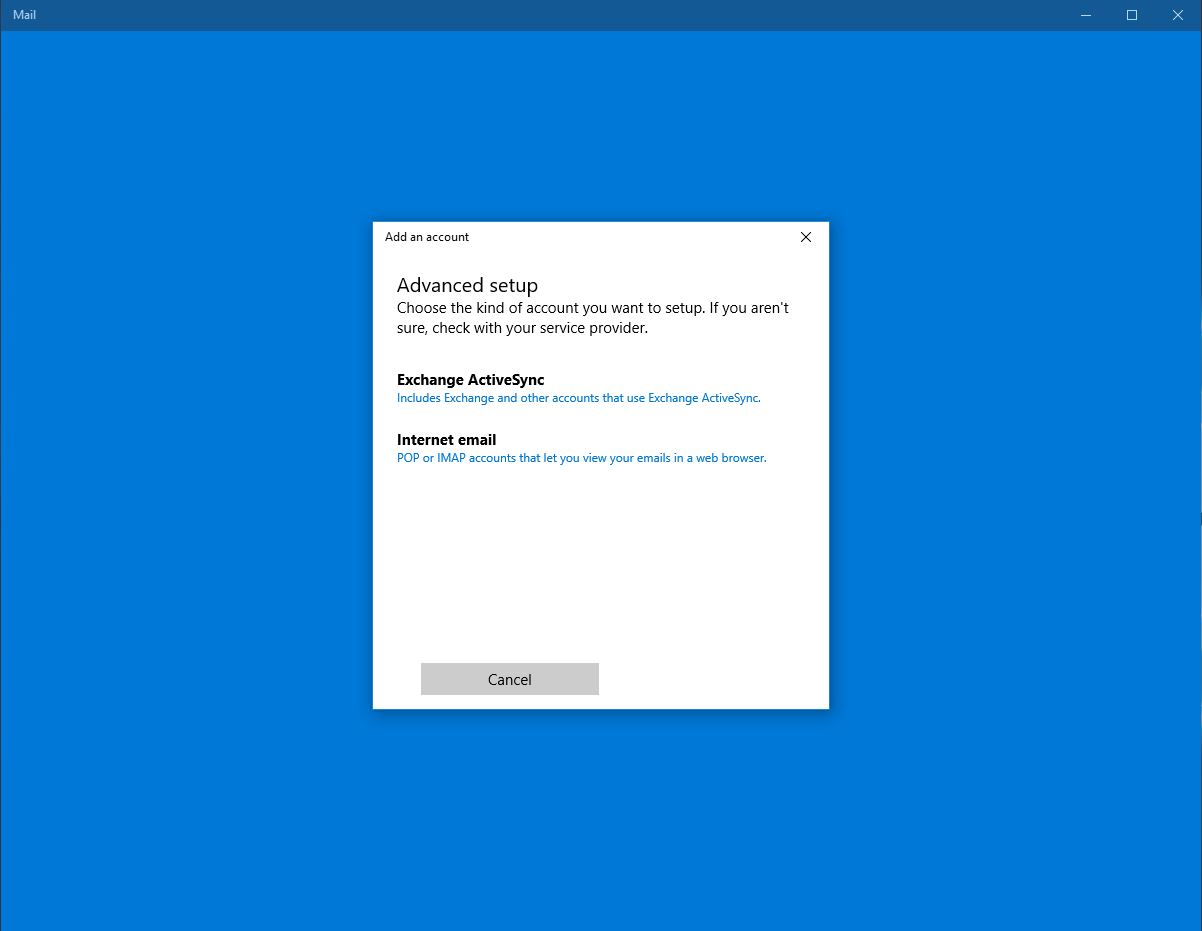
8. Now fill in the following information to the fields:
Email Address: your email
Password: your password
Username: your email
Server: exchange.anlx.net
Tick “Server requires encrypted (SSL) Connection
Account Name: a name you will associated with this account
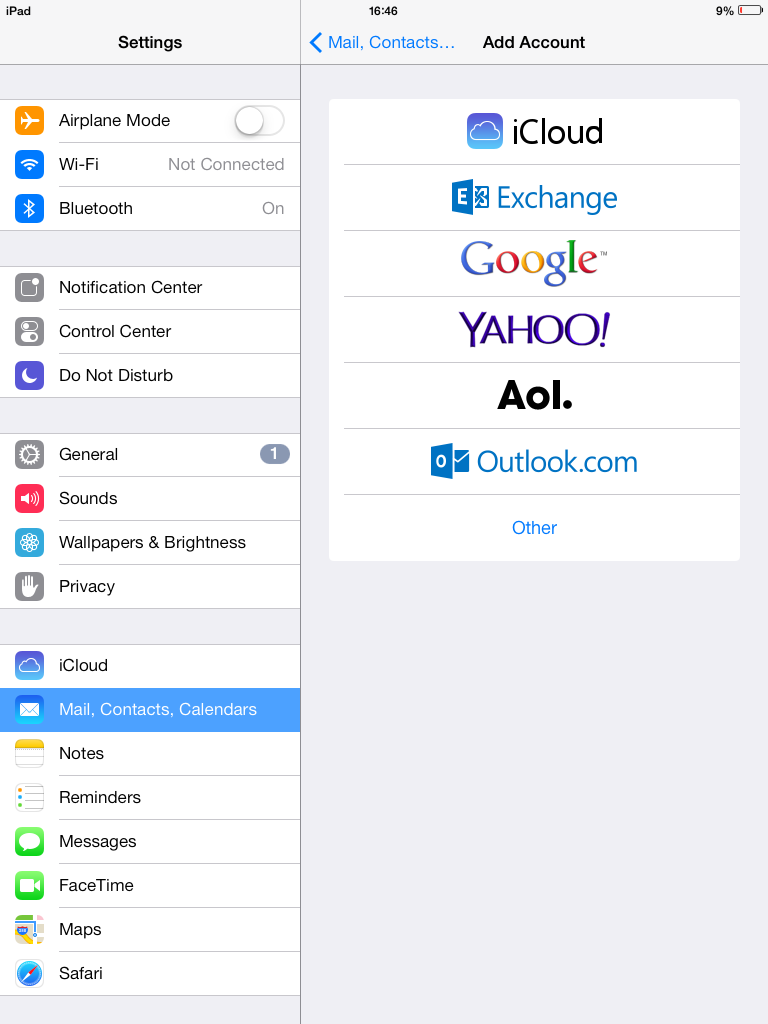
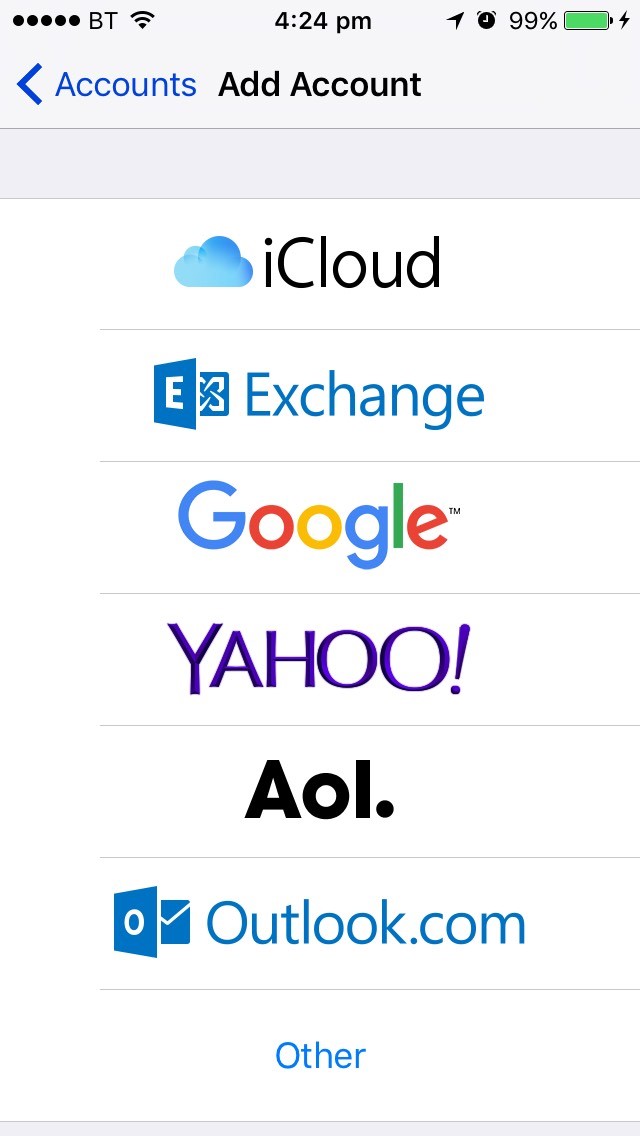
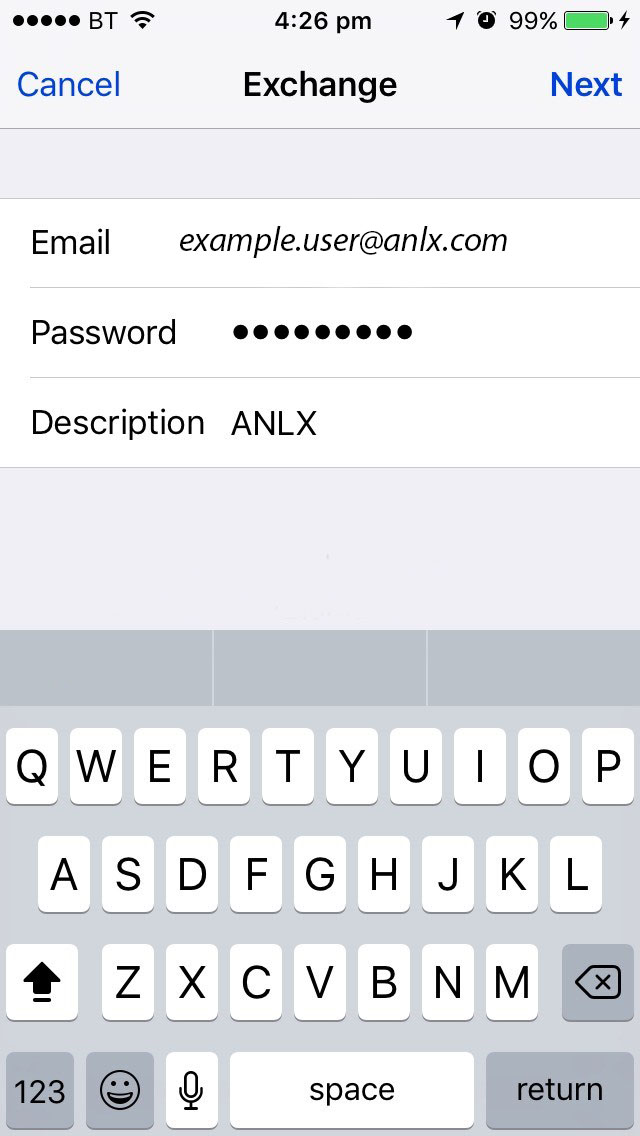
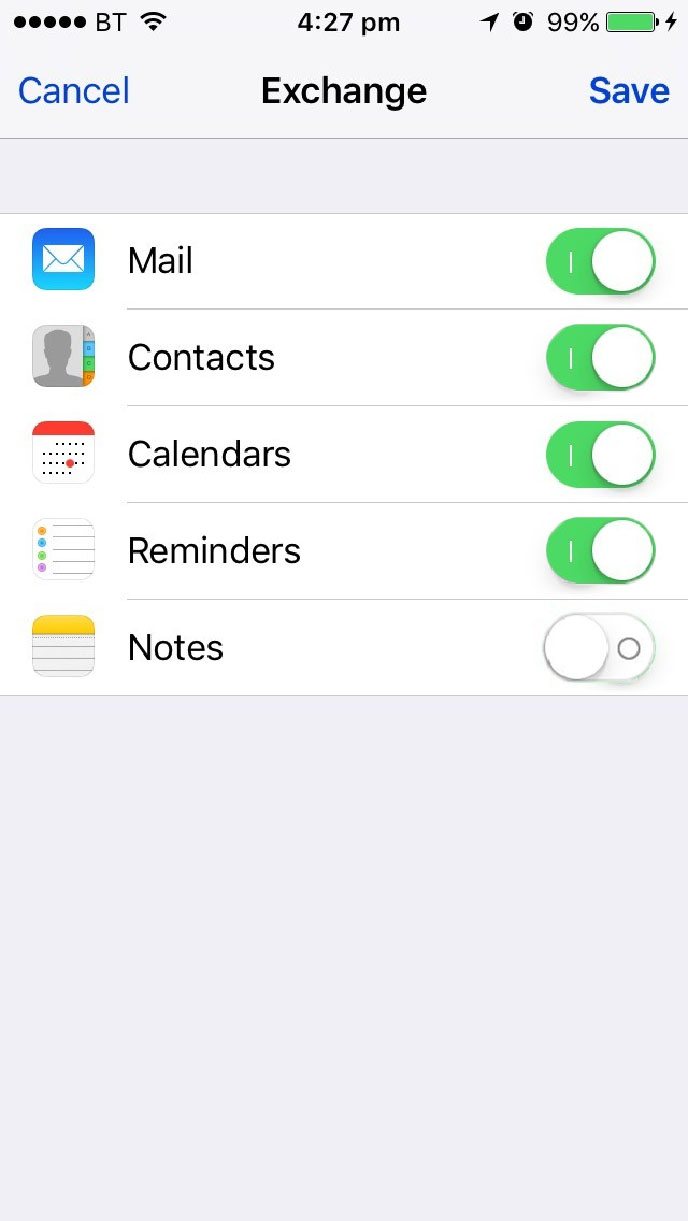
IOS 7 (Exchange)
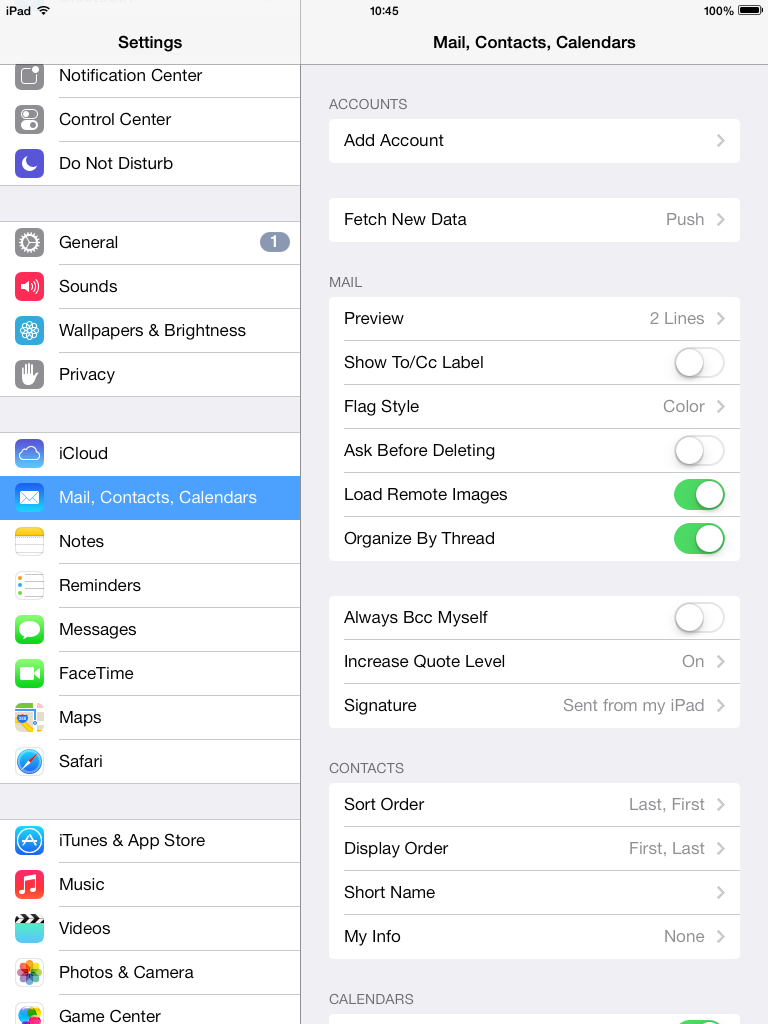
1.From the home screen, tap the settings icon

2.Select the “Mail, Contacts, Calendars tab on the left hand side.
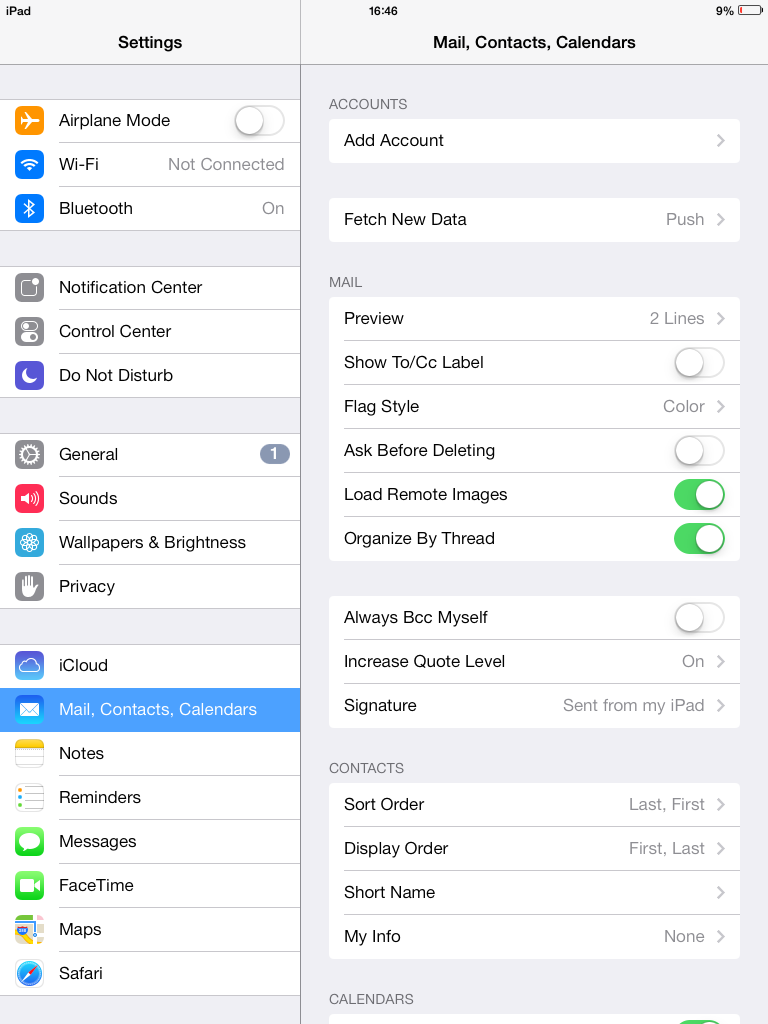
3.Select the exchange button second down in the list.
4.Now put in the details to the select fields:
Email Address: your email
Password: your password
Description: something you will recognize as this account

5.Now put all the following settings to the ON position:
Contacts
Calendars
Reminders
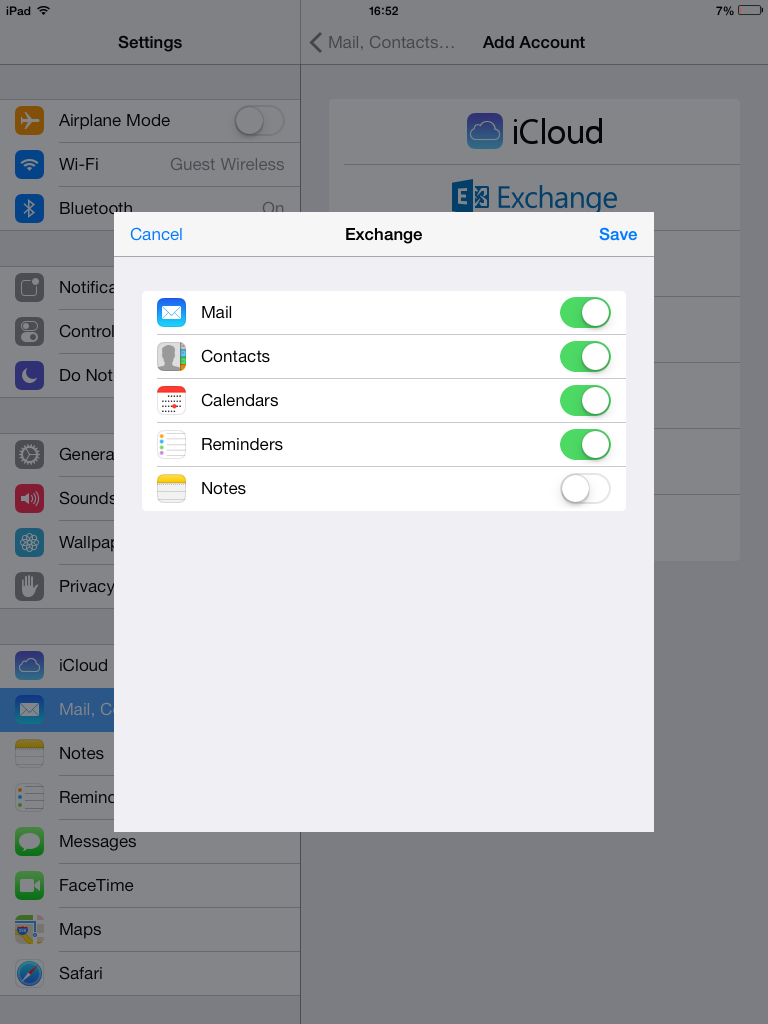
6.Finally click “Save” and you’re finished.
IOS 7 (IMAP)
1.From the home screen, tap the settings icon
2.Select the “Mail, Contacts, Calendars tab on the left hand side.
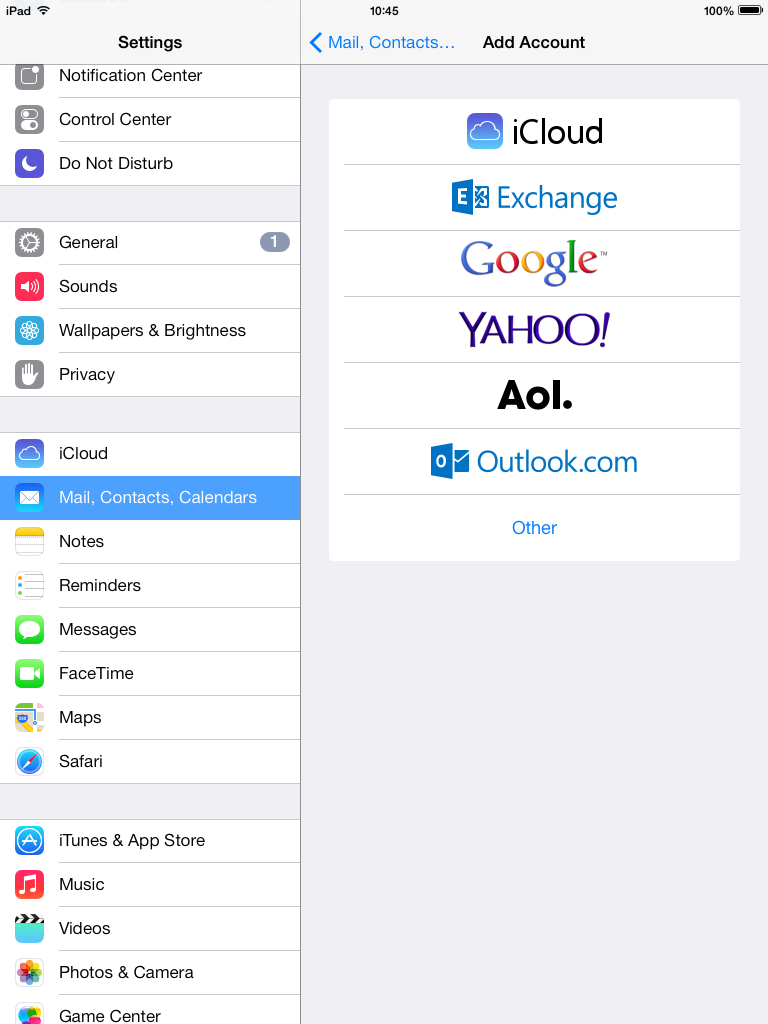
3.Click the “Other”, button on the bottom of the list
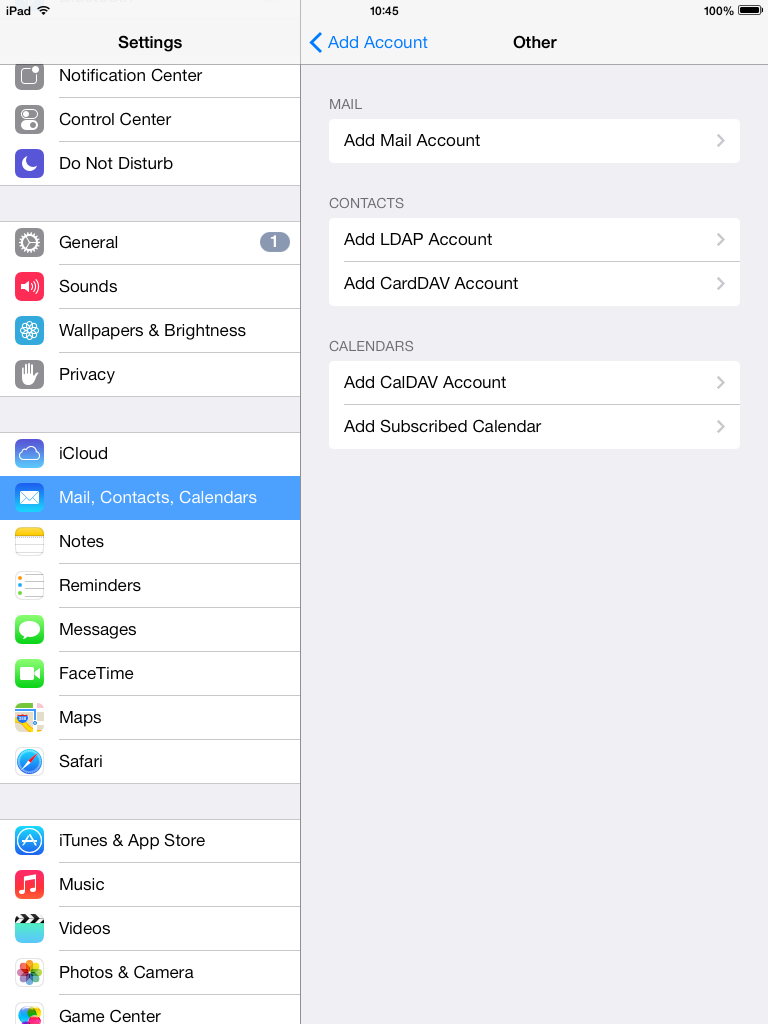
4.Now select the “Add Mail Account” option at he top of the screen
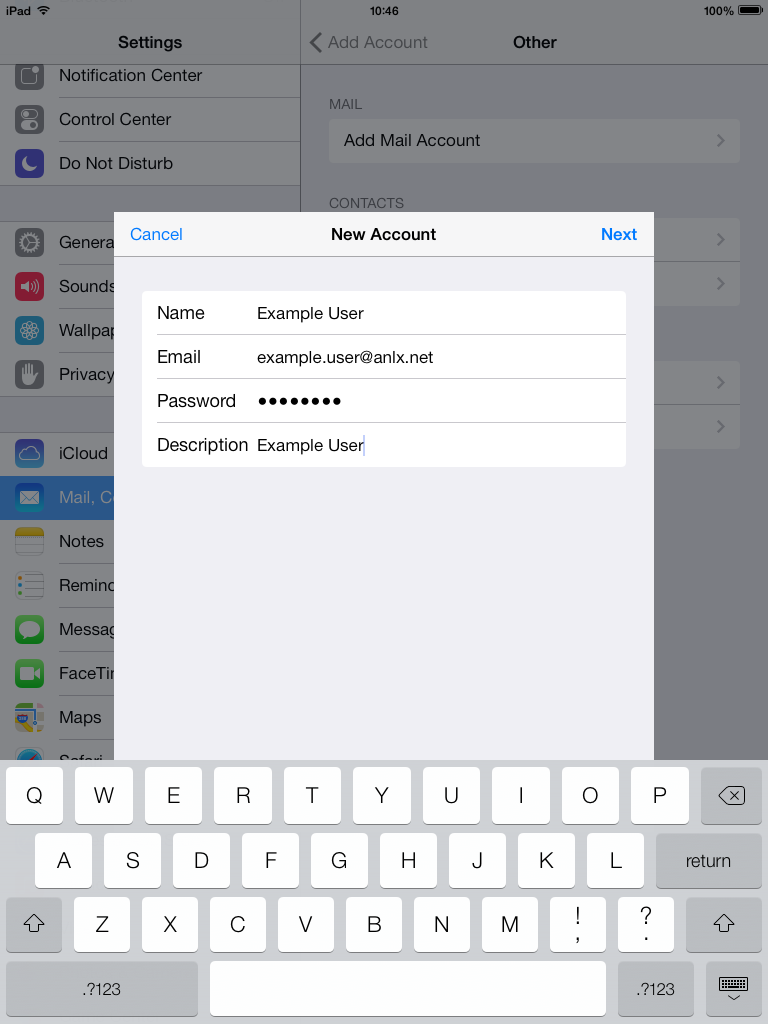
5.Now please enter these details into the fields:
Name
Email: your email
Password: your password
Description: something you will remember to identify this account
6.Now enter these details:
Host Name: imap.anlx.net
User Name: your email
Host Name (outgoing): smtp.anlx.net
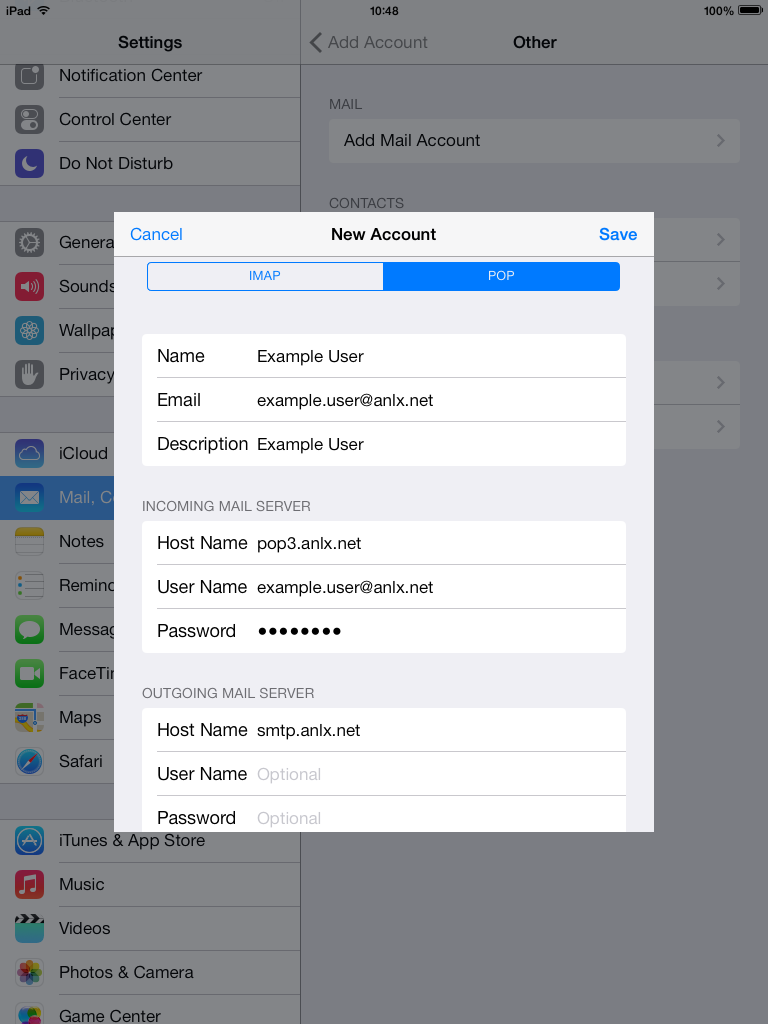
IOS 7 (POP3)
1.From the home screen, tap the settings icon

2.Select the “Mail, Contacts, Calendars tab on the left hand side.
3.Click the “Other”, button on the bottom of the list
4.Now select the “Add Mail Account” option at he top of the screen
5.Now please enter these details into the fields:
Name
Email: your email
Password: your password
Description: something you will remember to identify this account
6. Now enter these details:
Host name: pop3.anlx.net
User name: your email address
Host name (outgoing): smtp.anlx.net
IOS 10 (Exchange)
1.From the settings App, tap on “Mail”
2.In the mail page, select “Accounts”
3.Now select “Add Account”
4.Select “Exchange”
5.Now please fill in the following fields:
Email: your email address
Password: your password
Description: something you will recognise as this account
6.Now you can select what to sync from your email account to your device, it is usually:
Contacts
Calendars
Reminders
(not notes)
Then select “Save”
Android (IMAP)
On your devices home screen tap the app tray icon.
From the App tray, tap on the email icon on the left hand side of the screen
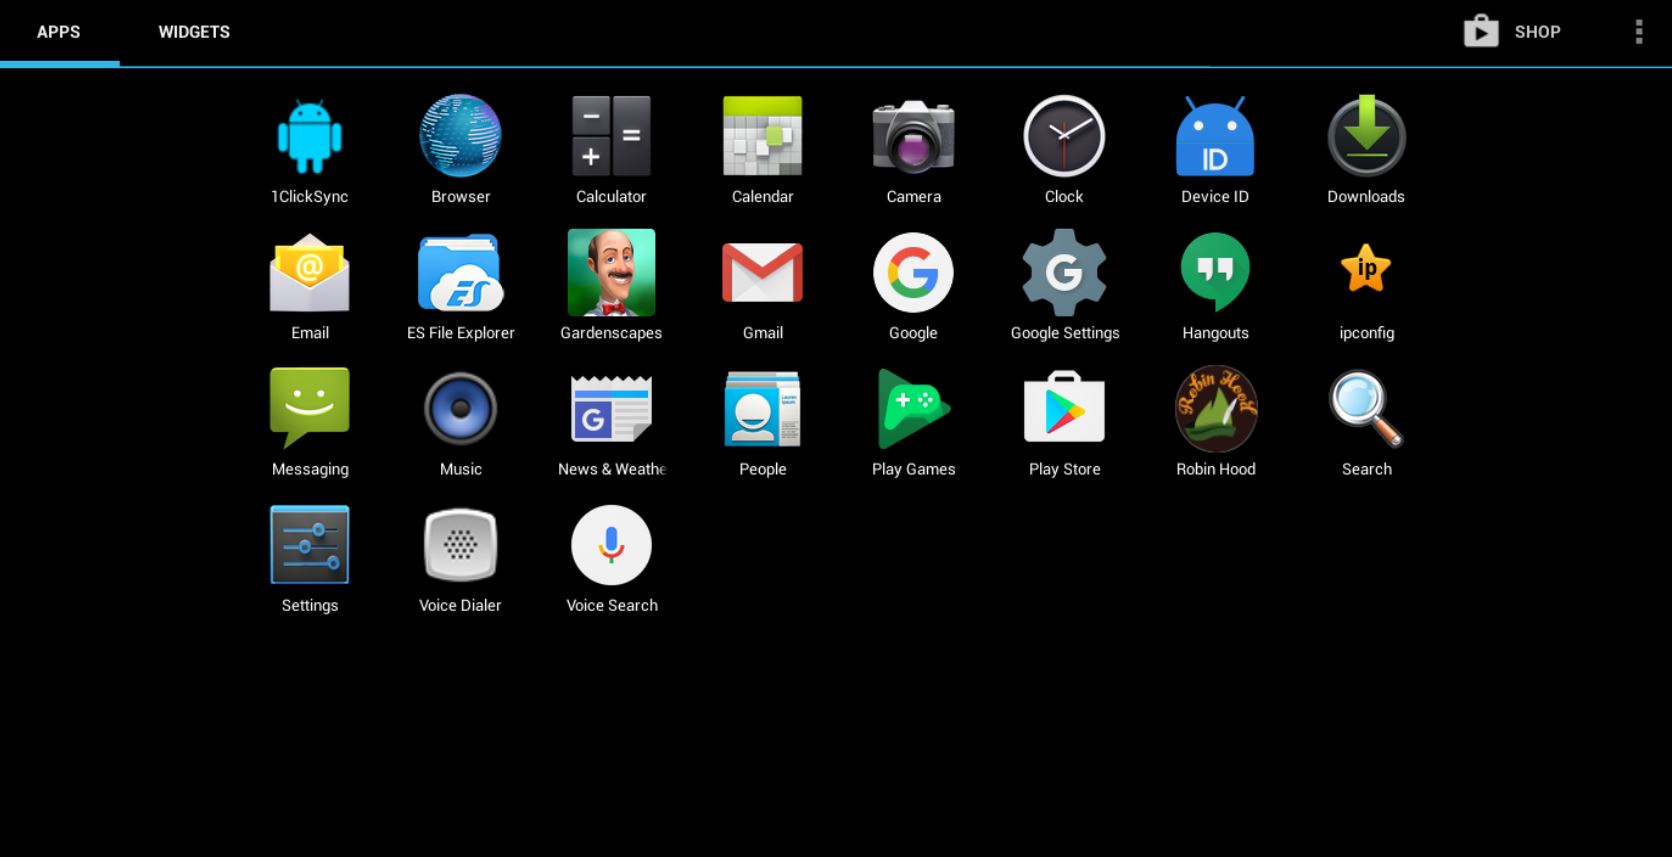
In the email app, please fill in the ‘Email address’ and ‘password’ fields with your information then select ‘next’

Select the “IMAP” button
Please fill in these fields with this information:
Username: your email
IMAP server: imap.anlx.net
Security type: None
Port: 143 (this should be default)
Then press “next”
Outgoing Server Settings:
SMTP server: smpt.anlx.net
Security type: SSL/TLS (accept all certificates)
Port: 465
Require sign in: Yes
Username: Your Email address
Password: Your Password

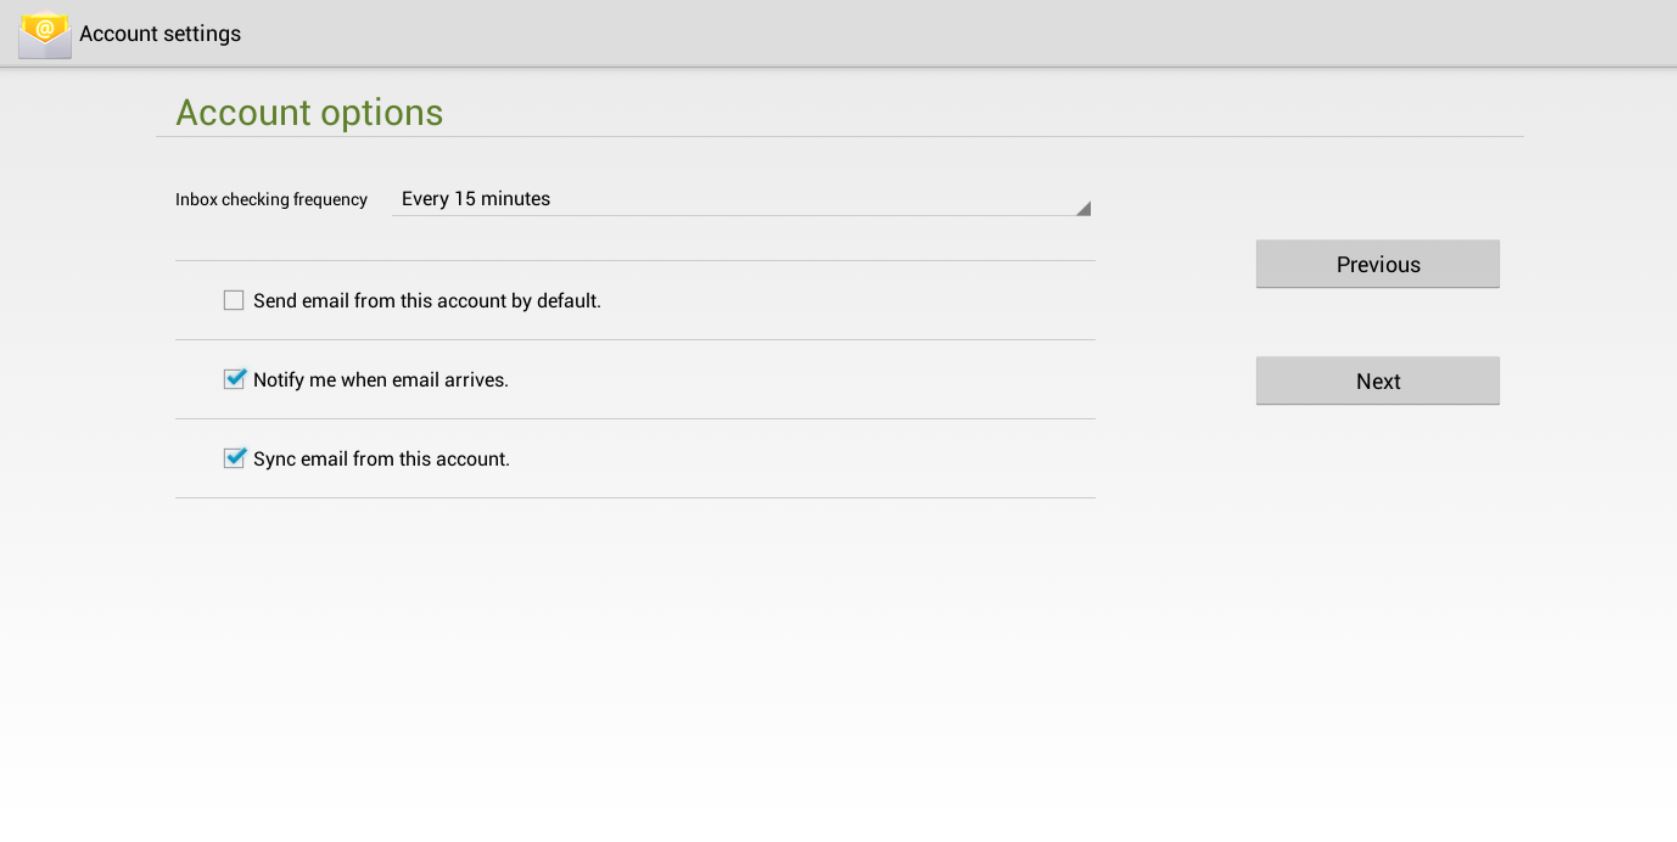
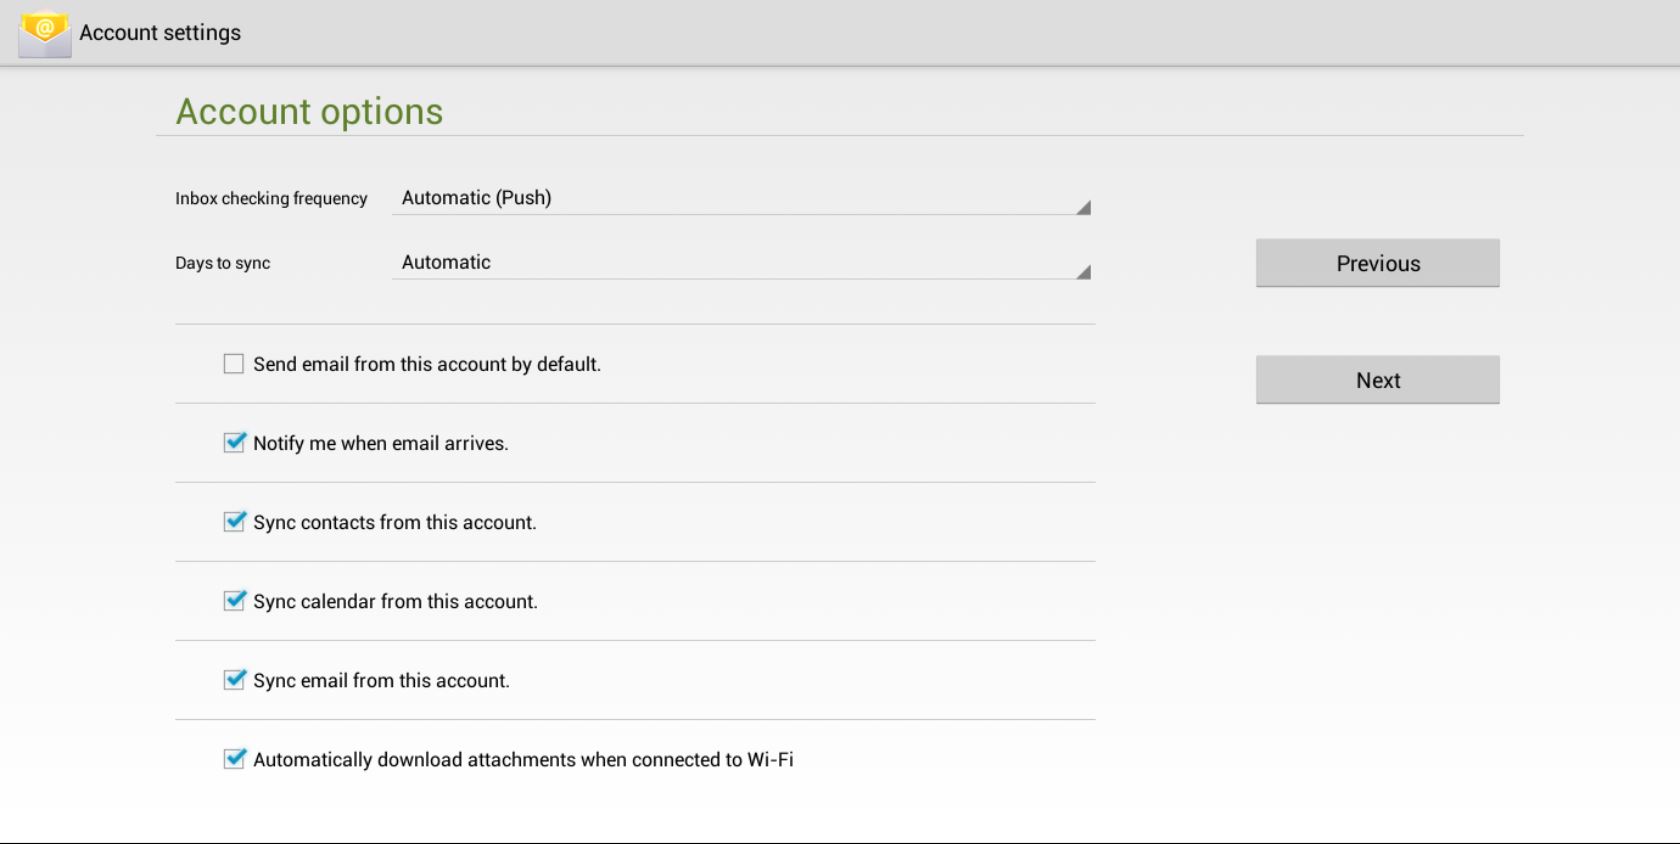
Inbox checking Frequency: Every 15 minuets
Make sure that these fields are checked yes:
- Notify me when email arrives
- Sync email from this account
- Automatically download attachments when connect to Wi-Fi
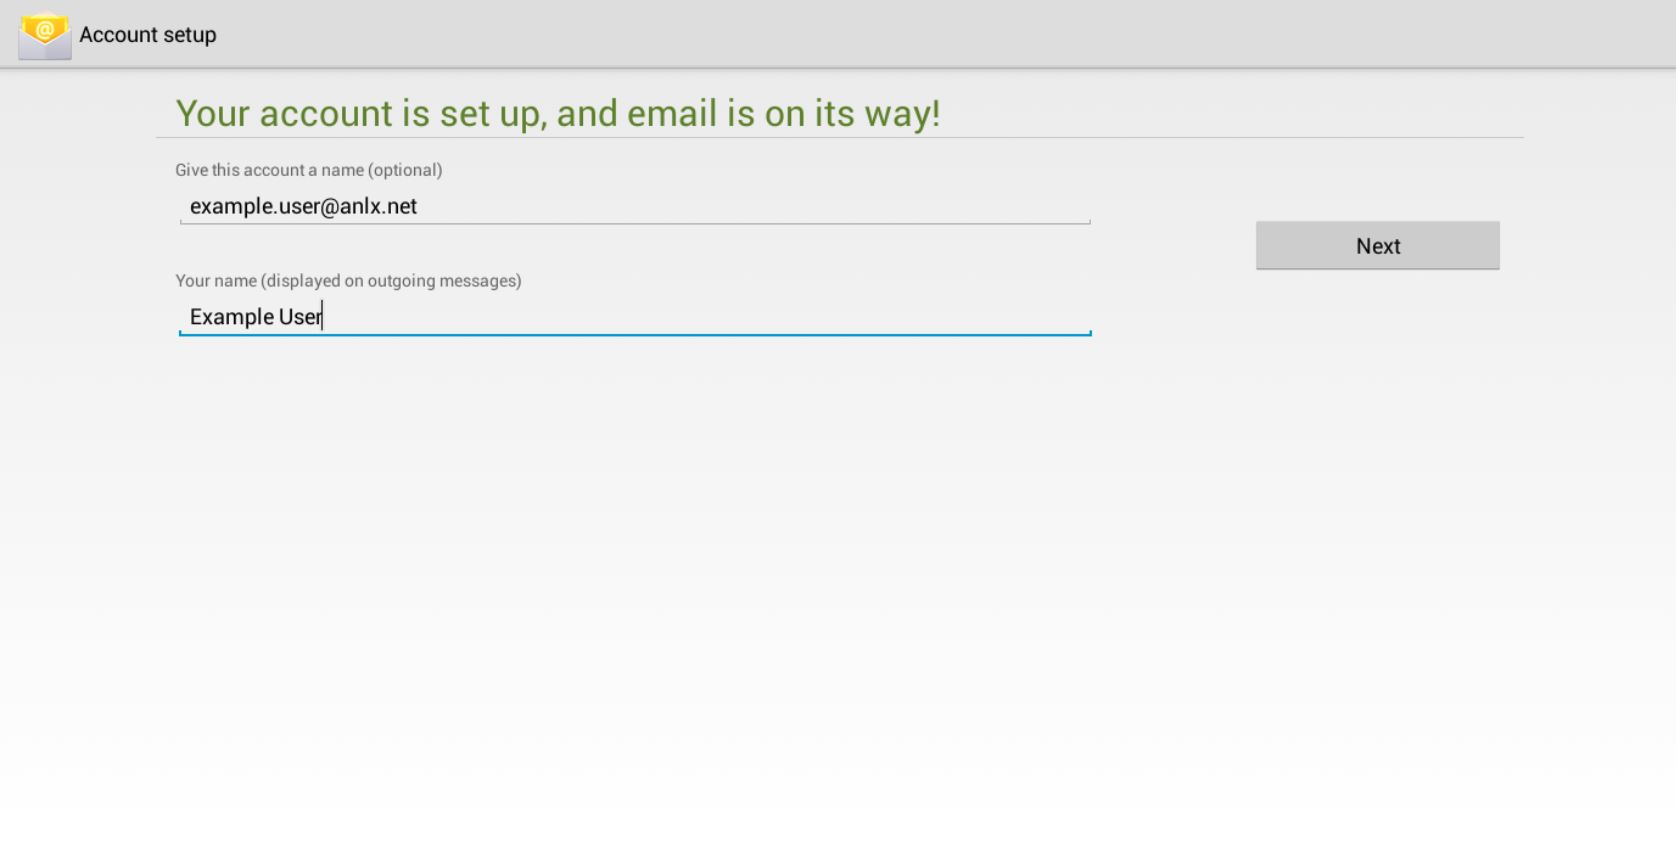
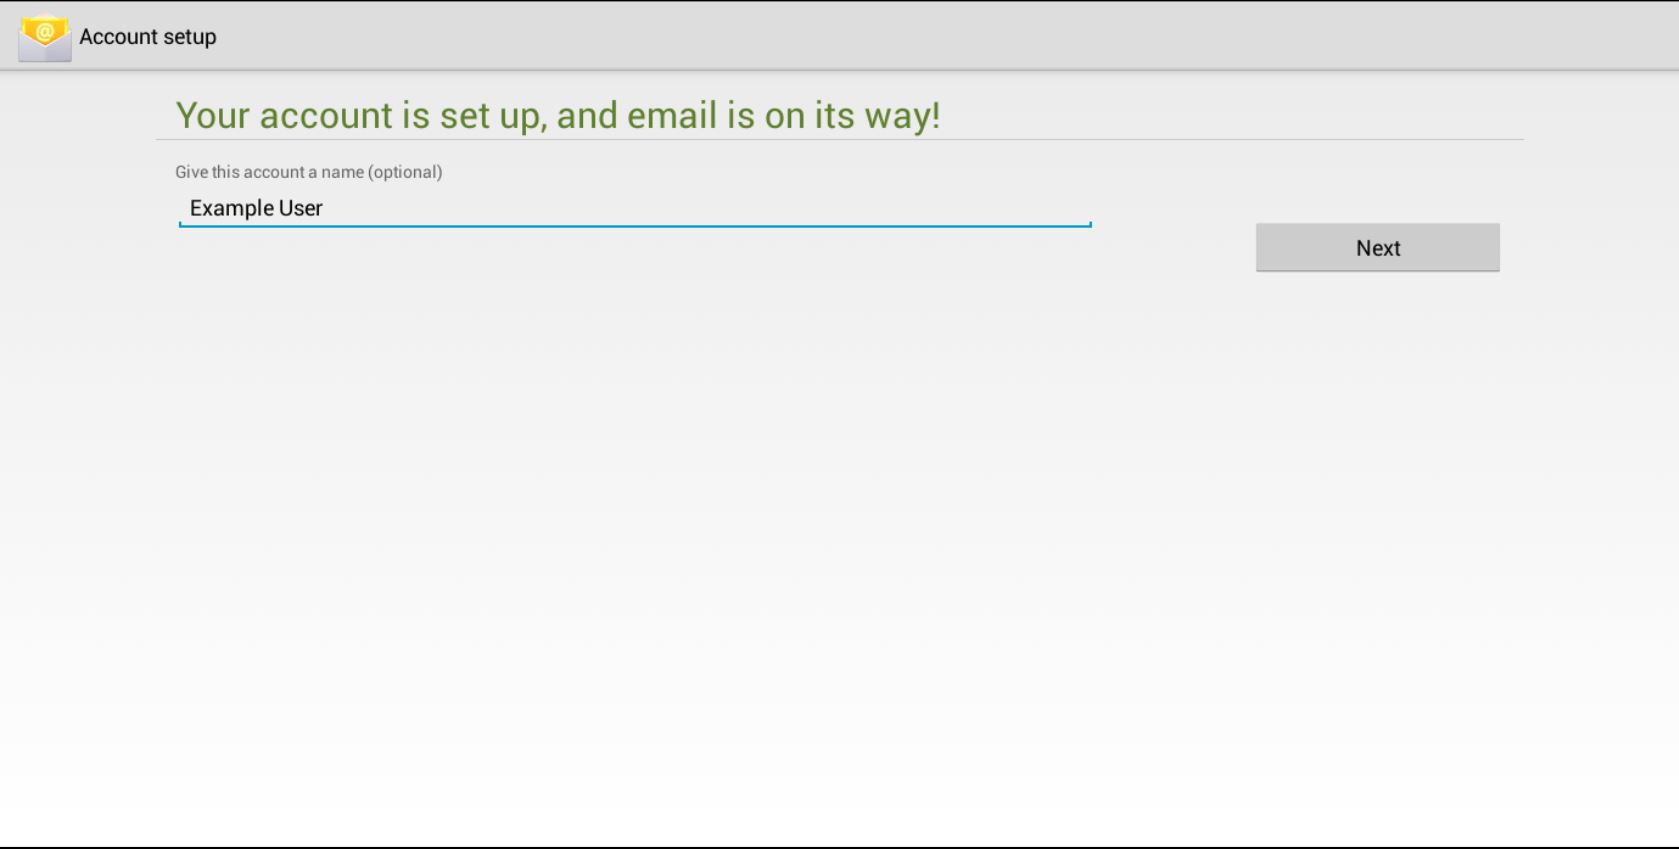
Give this account a name, this should be something you meaningful
Your name: this will be displayed on outgoing messages
Android (POP3)
1.On your devices home screen tap the app tray icon
2. From the App tray, tap on the email icon on the left hand side of the screen
3. In the email app, please fill in the ‘Email address’ and ‘password’ fields with your information then select ‘next’
Select the “POP3” button
Please fill in these fields with this information:
Username: Email address
Password
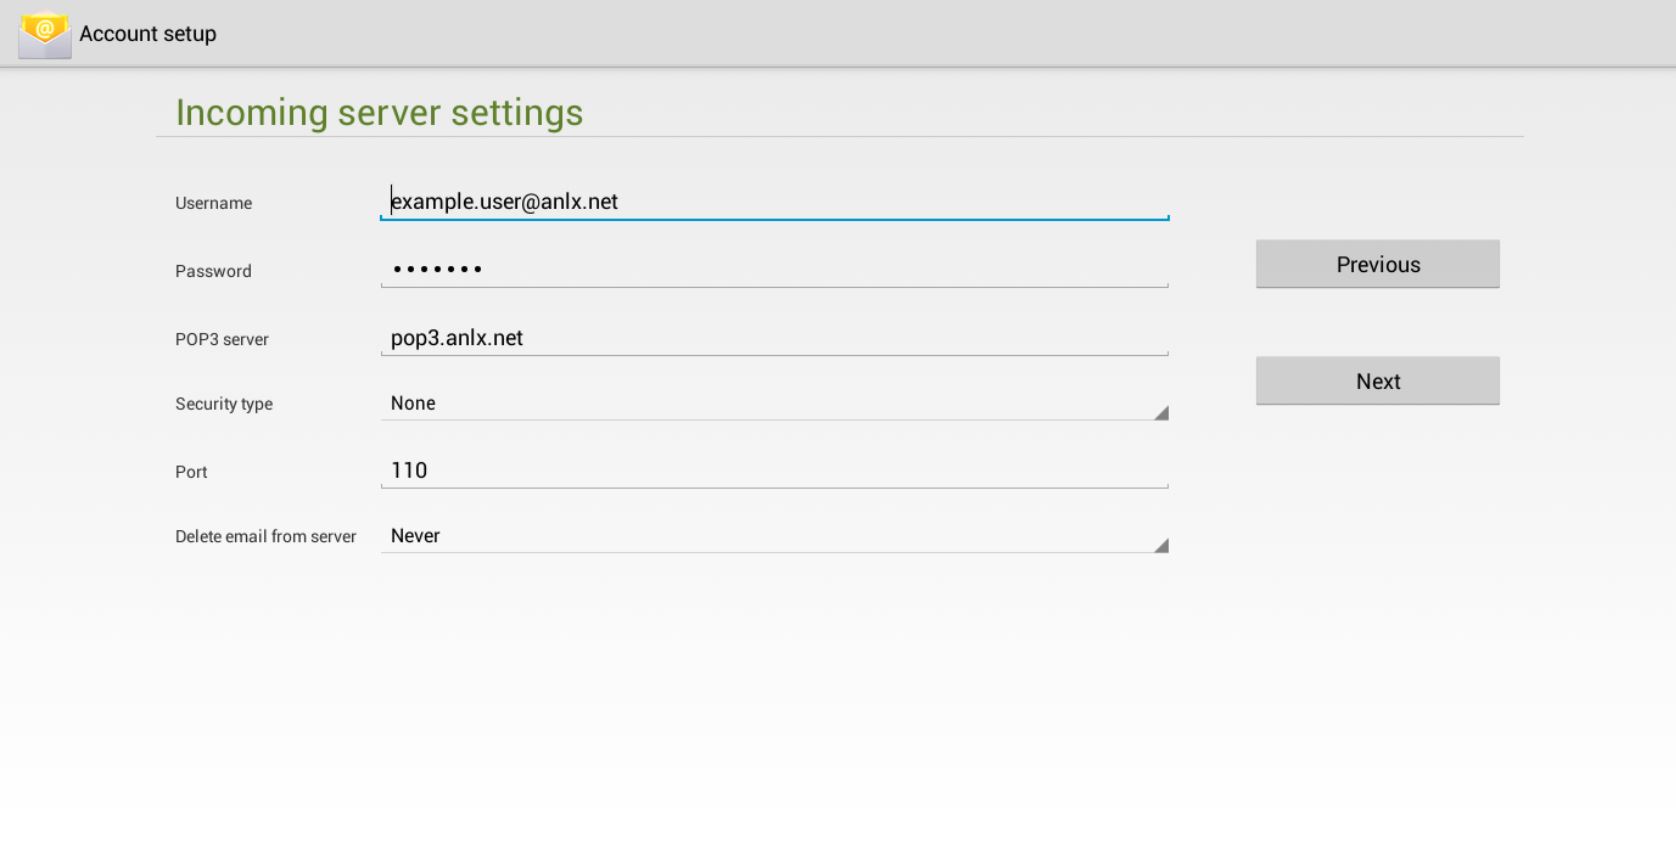
POP3 Server: pop3.anlx.net
Security Type: None
Now fill out the outgoing server settings:
SMTP server: smtp.anlx.net
Security Type: SSL/TLS (accept all certificated)
Port: 465
Now make sure that the inbox check frequency is set to 15 minutes, “Notify me when email arrives”, and “Sync email from account” are both checked. And press next
Now give this account a name, for example: Work Email
Then enter your name
To finish press next.
Android (Exchange)
1.On your devices home screen tap the app tray icon

2. From the App tray, tap on the email icon on the left hand side of the screen

3. In the email app, please fill in the ‘Email address’ and ‘password’ fields with your information then select ‘next’
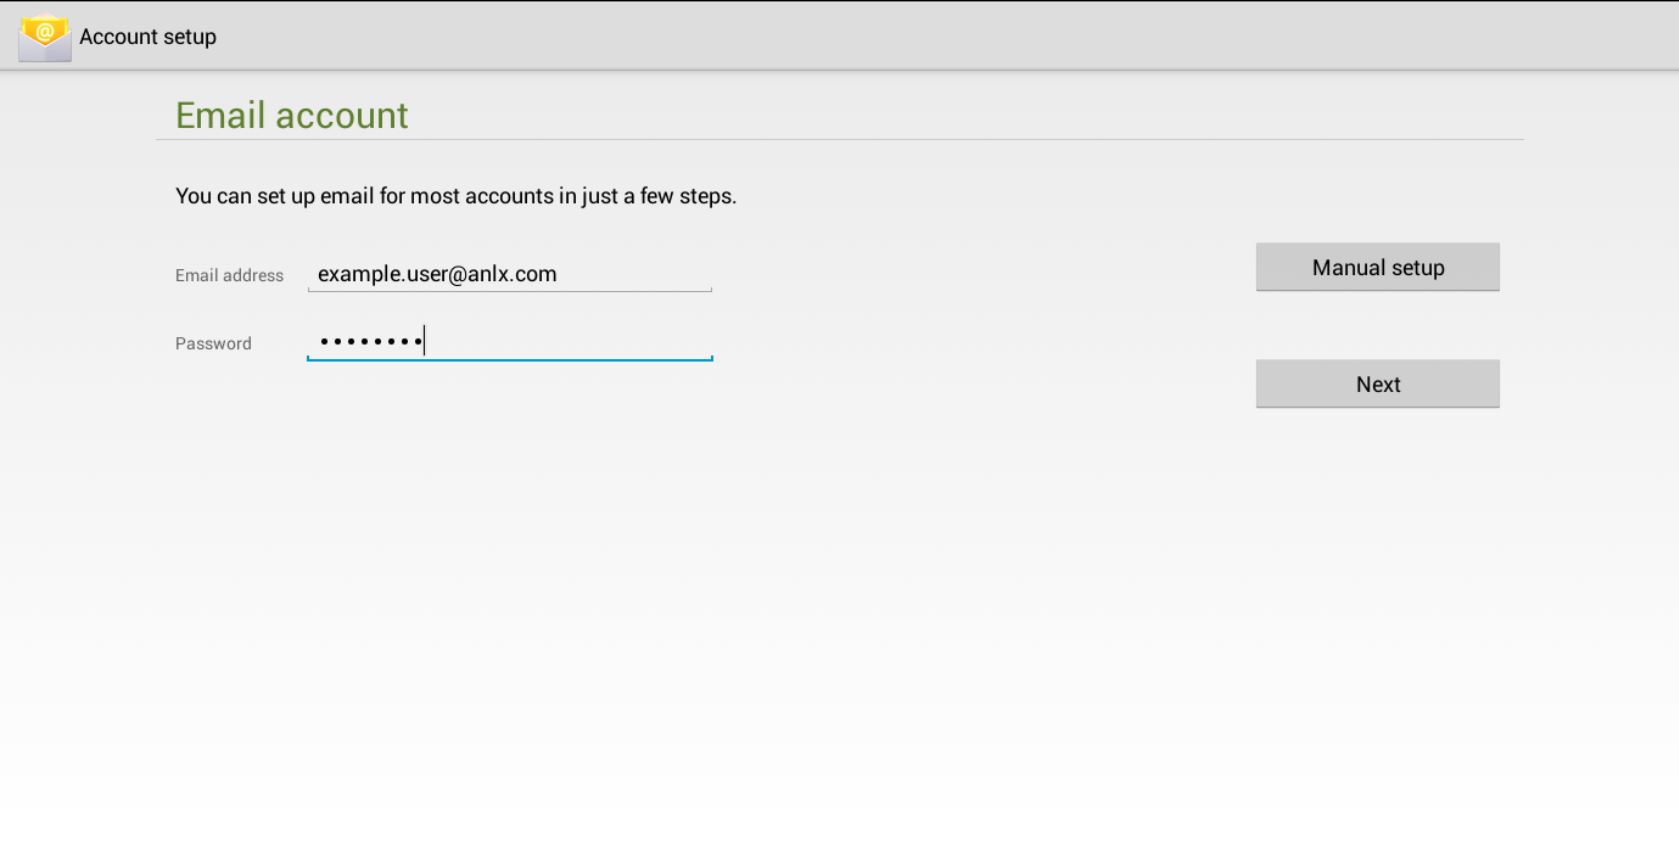
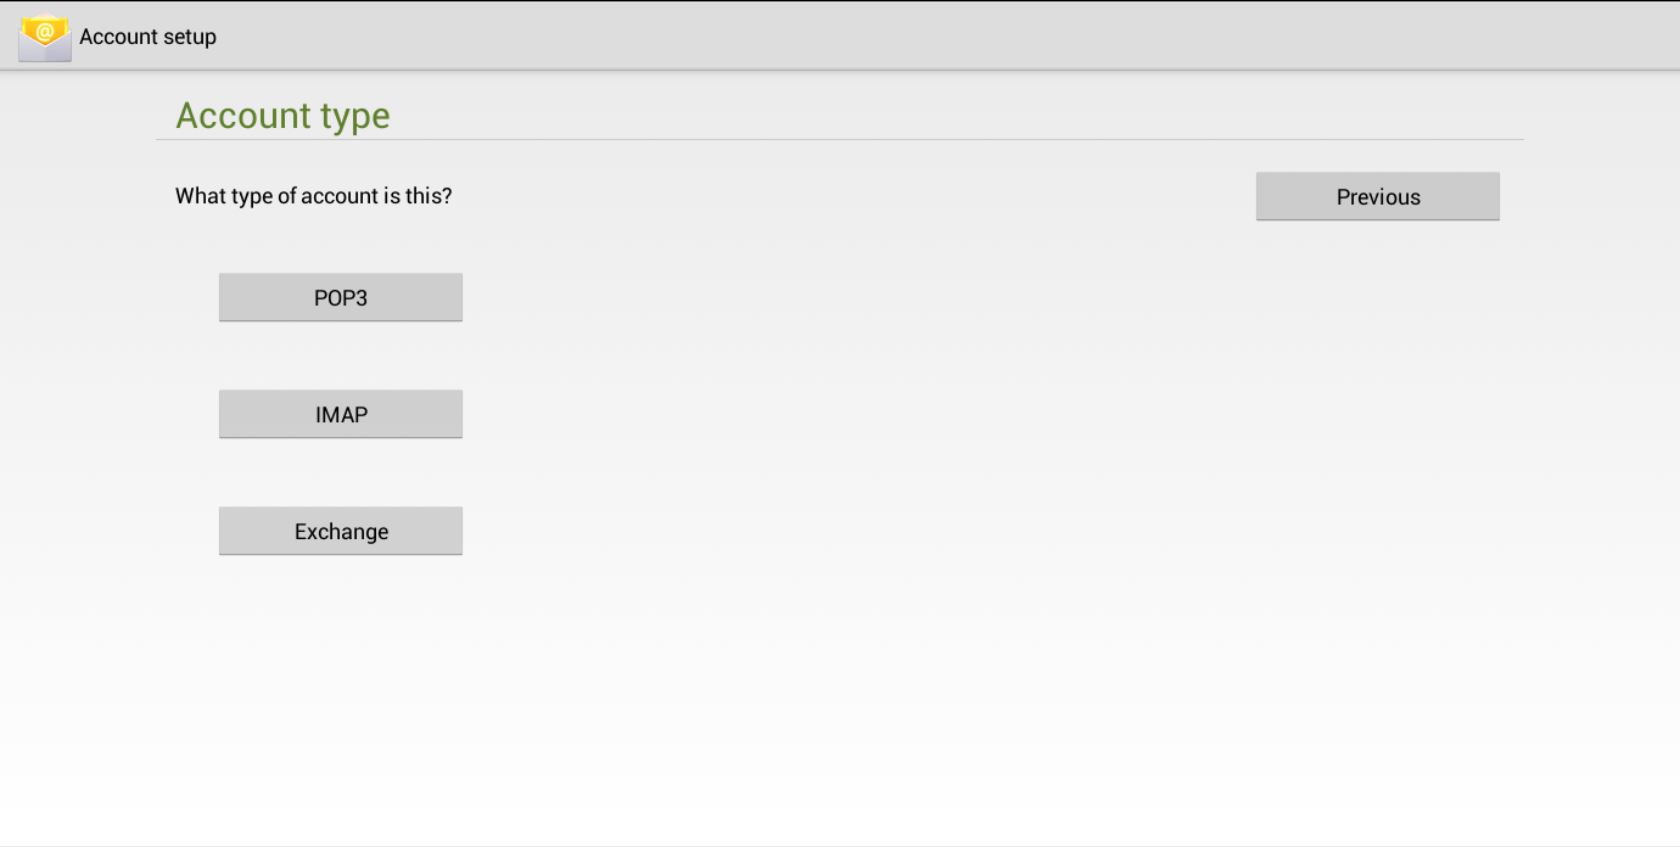
4. Select the “Exchange” button
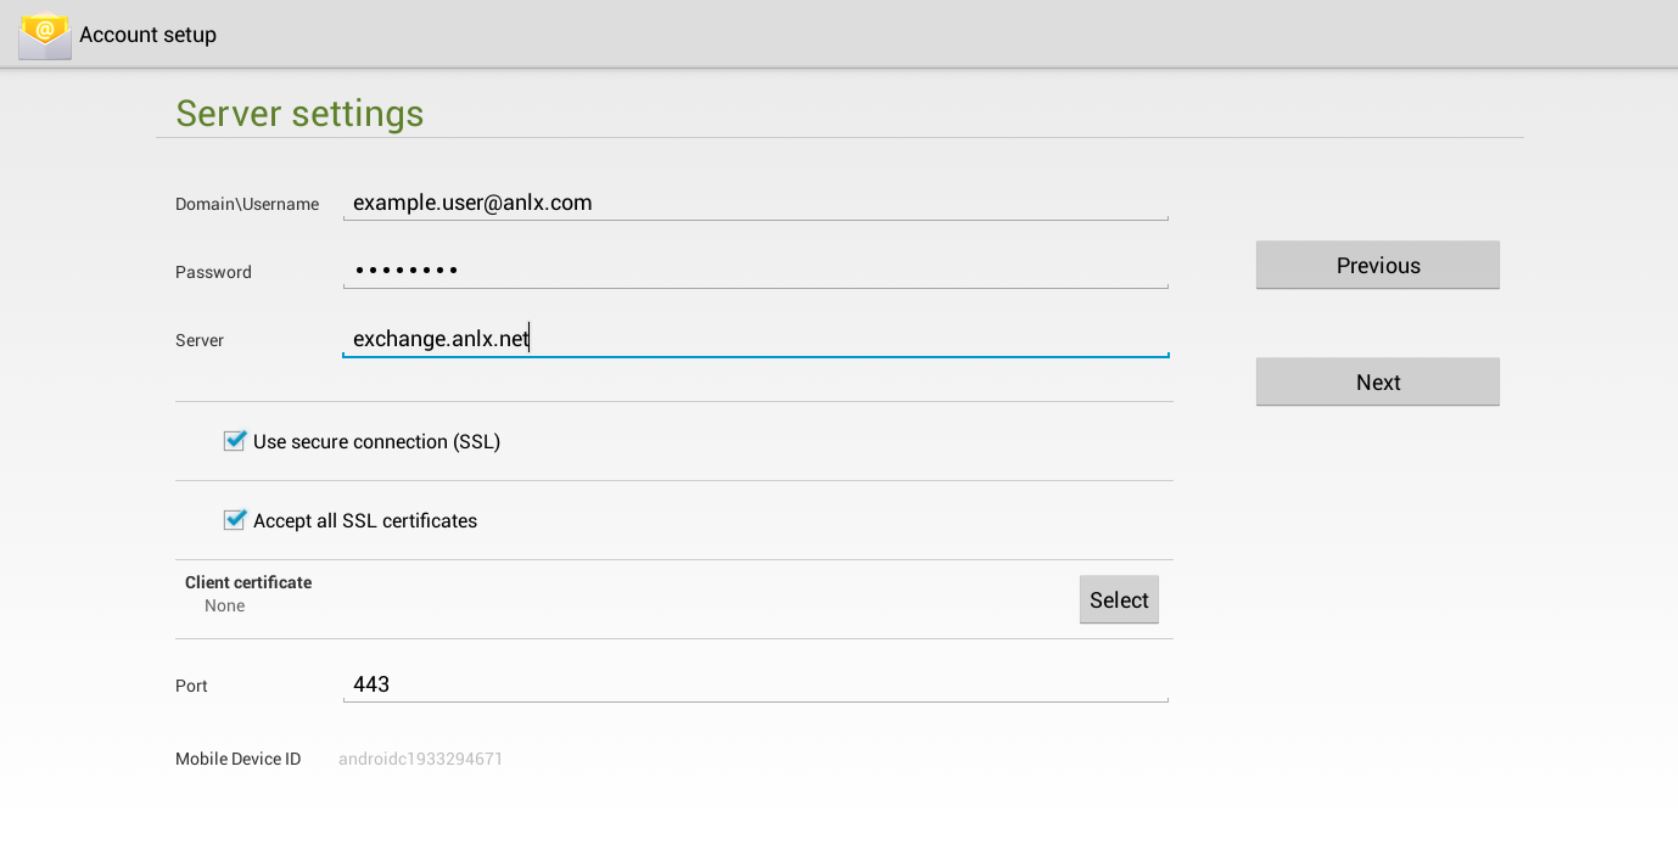
5.Please fill in the fields with this information
Domain: Your Email
Server: exchange.anlx.net
Make sure to have “Use secure Connection (SSL)”, and “Accept all SSL certificates” enabled
6.In the “Account option” page, make sure all these options are selected
- Notify me when email arrives
- Sync contacts from this account
- Sync calendar from this account
- Sync email from this account
- Automatically download attachments when connected to Wi-Fi
Then select the next button
7.Finally, you need to give you email account a name, ideally something you will recognize, and then select next.
Thunderbird (POP3)
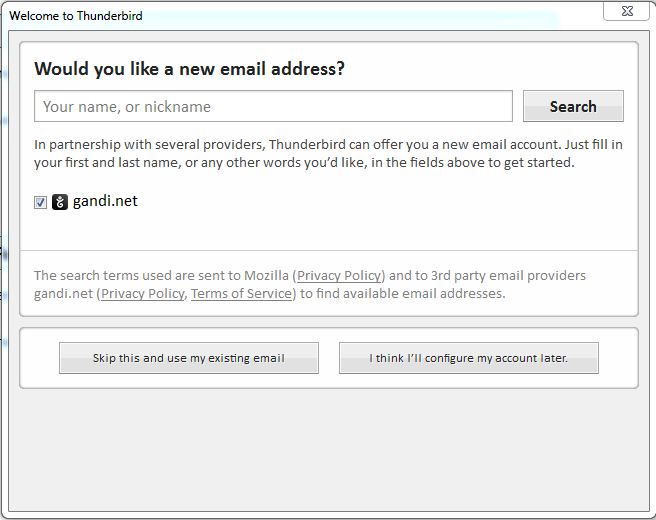
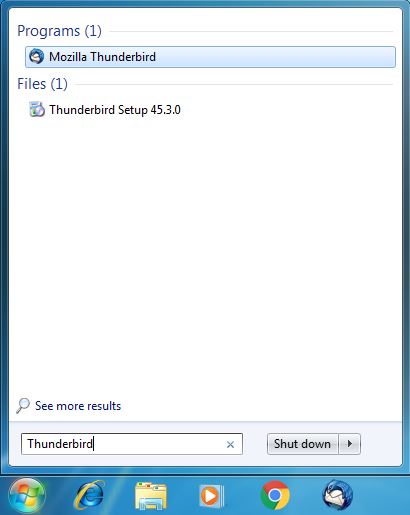
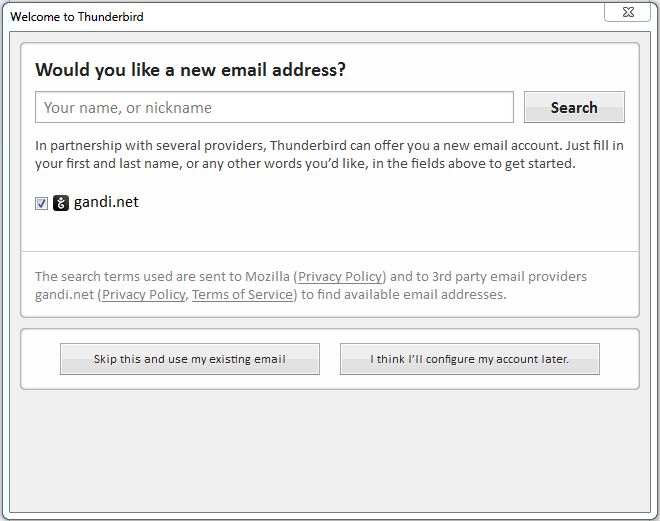
1. Open the start menu by clicking the windows icon on the bottom left of the screen, and type Thunderbird

2. In Thunderbird, click on email

3. Now click “Skip this and use my existing email”
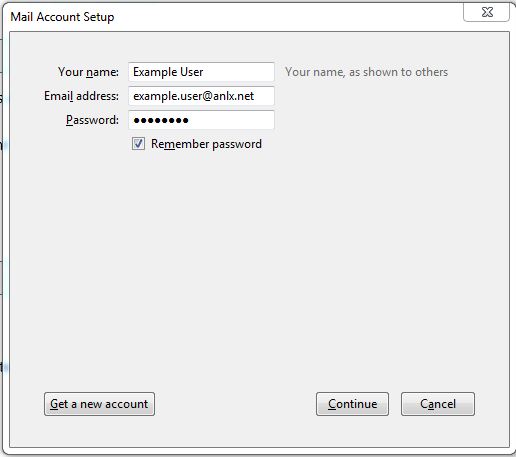
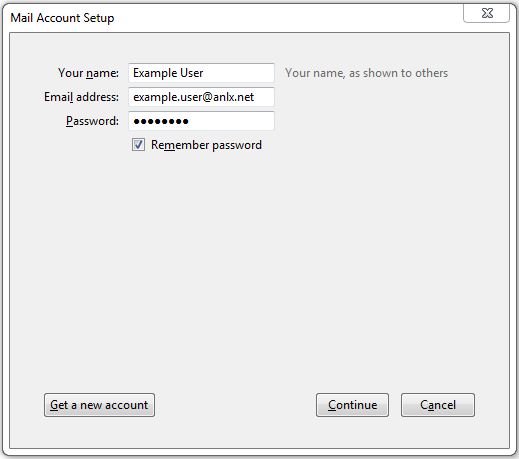
4. Now enter your account info:
Your Name: your name
Email Address: your email
Password: your password
‘Continue’
5. Now fill in the following fields:
Incoming: Pop3
Server hostname: pop3.anlx.net
Port 110
SSL: none
Authentication: AutoDetect
Outgoing: SMTP
Server hostname: smtp.anlx.net
Port: 465
SSL: SSL/TLS
Authentication AutoDetect
Username Incoming: example.user
Username Outgoing: example.user
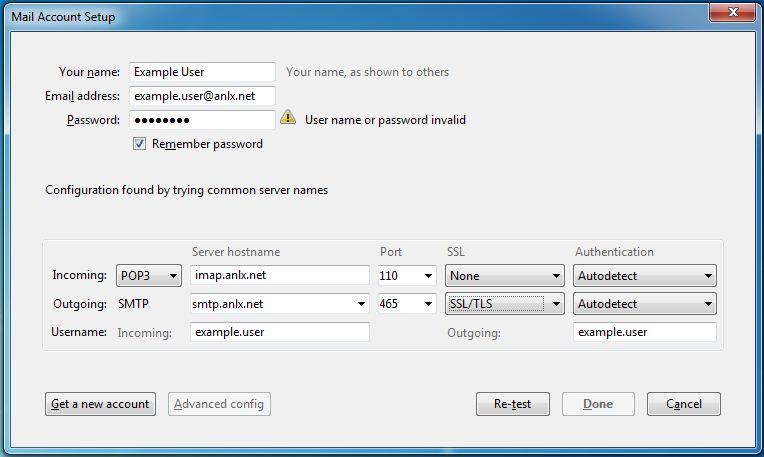
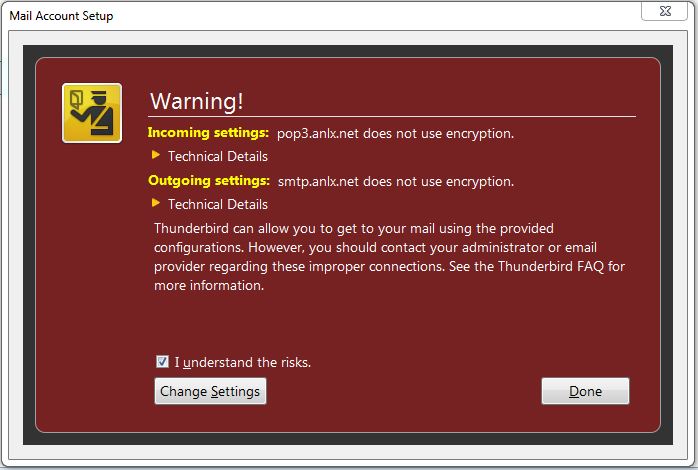
Now click “I understand the risks” and click Done
Thunderbird (IMAP)
1. Open the start menu by clicking the windows icon on the bottom left of the screen, and type Thunderbird
2. In Thunderbird, click on email
3. Now click “Skip this and use my existing email”
4. Now enter your account info:
Your Name: your name
Email Address: your email
Password: your password
“Continue”
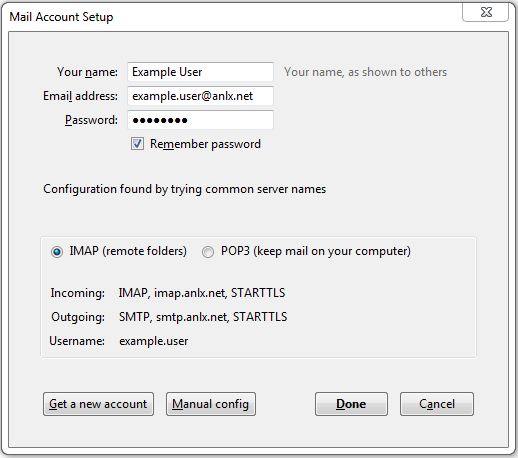
5. Now select: IMAP
Then “Manual Config”
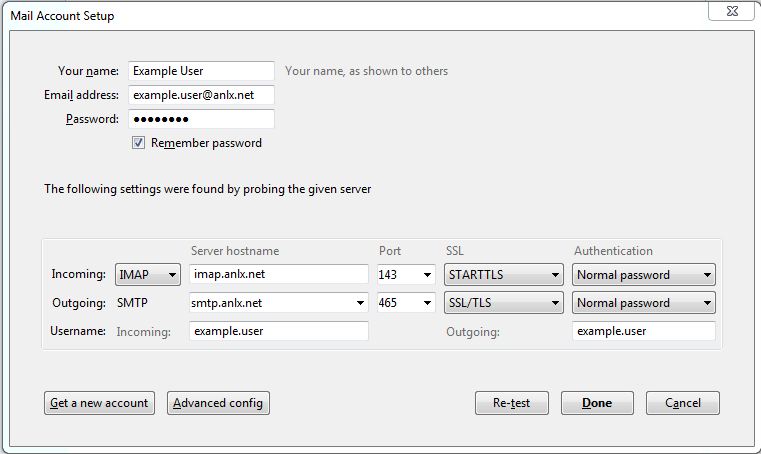
6. Now please fill in the fields:
Incoming: IMAP
Server hostname: imap.anlx.net
Port: 143
SSL: STARTTLS
Authentication: Normal Password
Outgoing: SMTP
Server hostname: smtp.anlx.net
Port: 465
SSL: SSL/TLS
Authentication: Normal Password
Username Incoming: example.user
Username Outgoing example.user
Now select “Done”
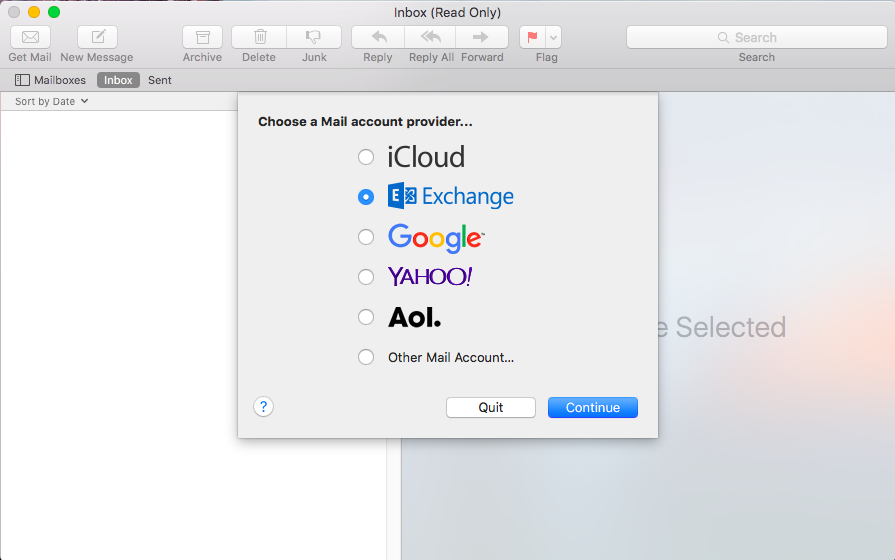
Mac Mail (Exchange)
From the desktop open “Mail” from the left hand side of the dock

Go to “Mail”, and click “Add Account”

Select “Exchange” and press “Continue”
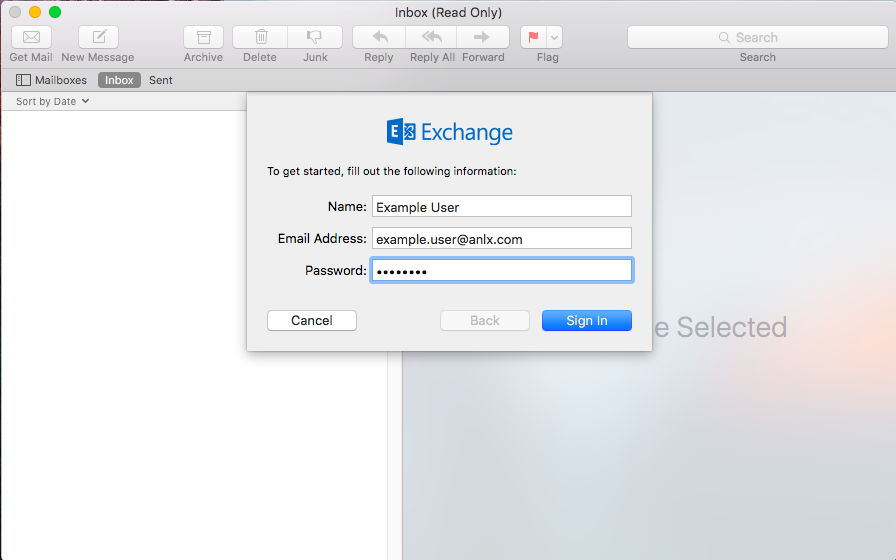
Now enter these details in the fields:
Name: Your Name
Email Address: your email address
Password: your password
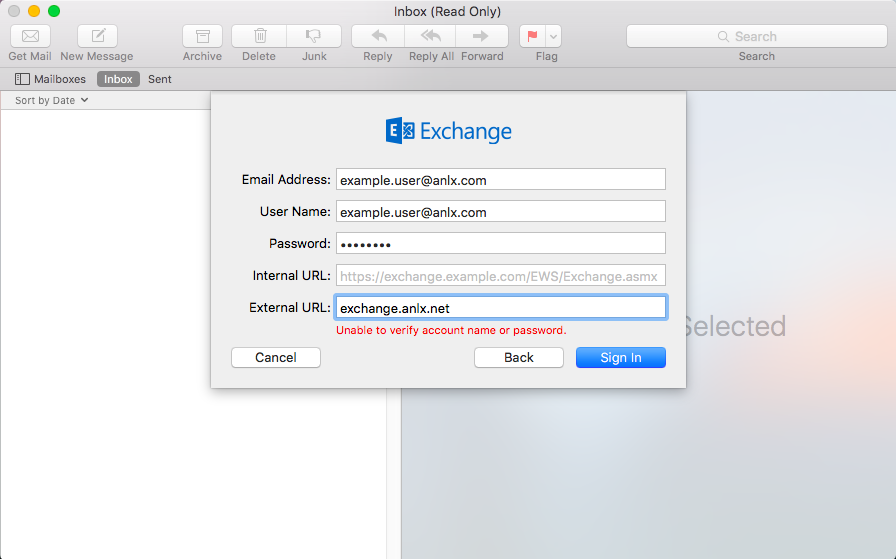
Now enter these details in the fields:
Email Address: your email
User Name: your email again
Password: your password
External URL: exchange.anlx.net
Then click “Sign in”
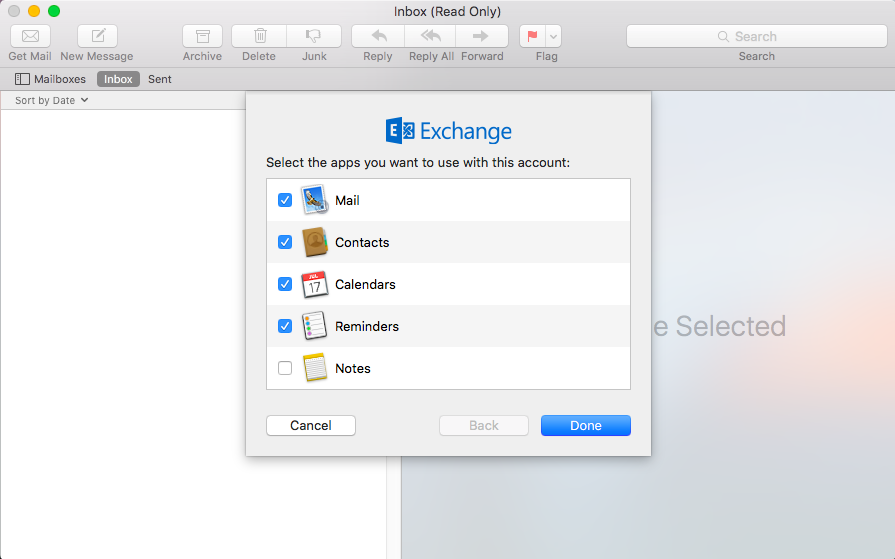
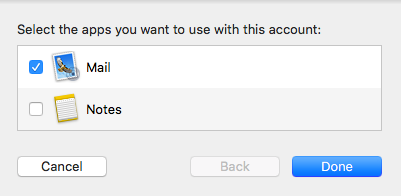
Now select all the option other than “Notes” then click “Done”
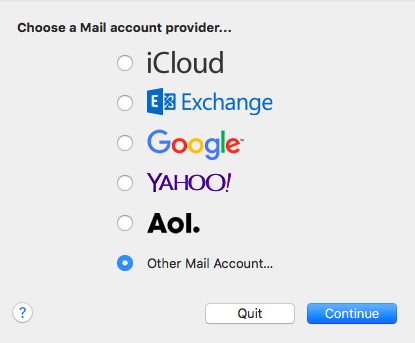
Mac Mail (IMAP)
From the desktop open “Mail” from the left hand side of the dock

Go to “Mail”, and click “Add Account”
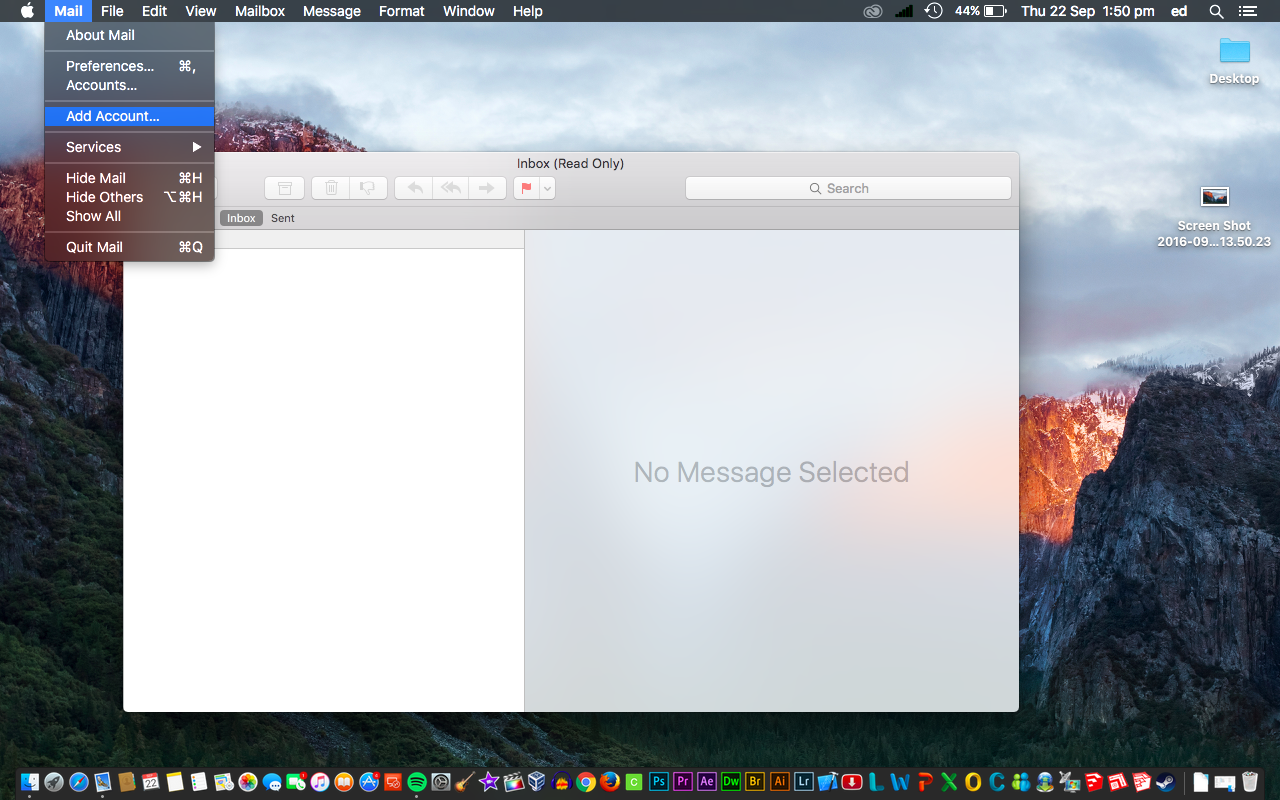
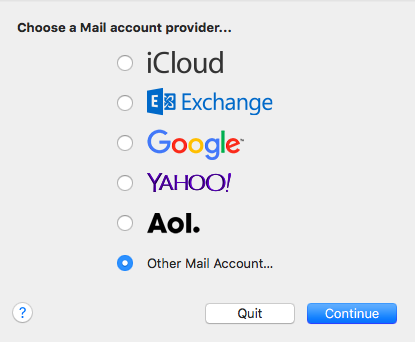
Select “Other Mail Account”
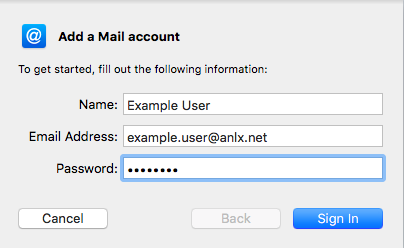
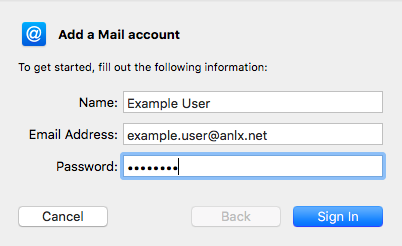
Now fill in the information into the fields:
Name: Your name
Email Address: your email address
Password: your email password
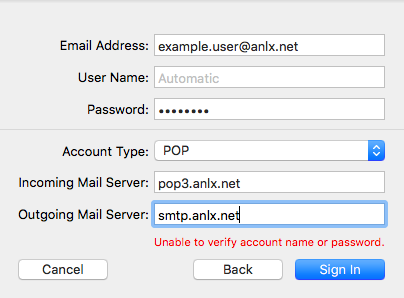
Now these fields:
Email Address
Password
Account Type: IMAP
Incoming mail server: imap.anlx.net
Outgoing mail sever: smtp.anlx.net
Then “Sign in”

Then select “Mail” and click “Done”
Mac Mail (POP3)
1.From the desktop open “Mail” from the left hand side of the dock

2.Go to “Mail”, and click “Add Account”

3.Select “Other Mail Account”
4.Now fill in the information into the fields:
Name: Your name
Email Address: your email address
Password: your email password
5.Now these fields:
Email Address
Password
Account Type: POP
Incoming mail server: pop3.anlx.net
Outgoing mail sever: smtp.anlx.net
Then “Sign in”
6.Then select “Mail” and click “Done”
Outlook 2011 Mac
1.From the desktop click the small magnifying glass in the top right of the screen

2.When this box appears type “Outlook”
3.Now click the “Outlook” tab on the left and then go to “Preferences”
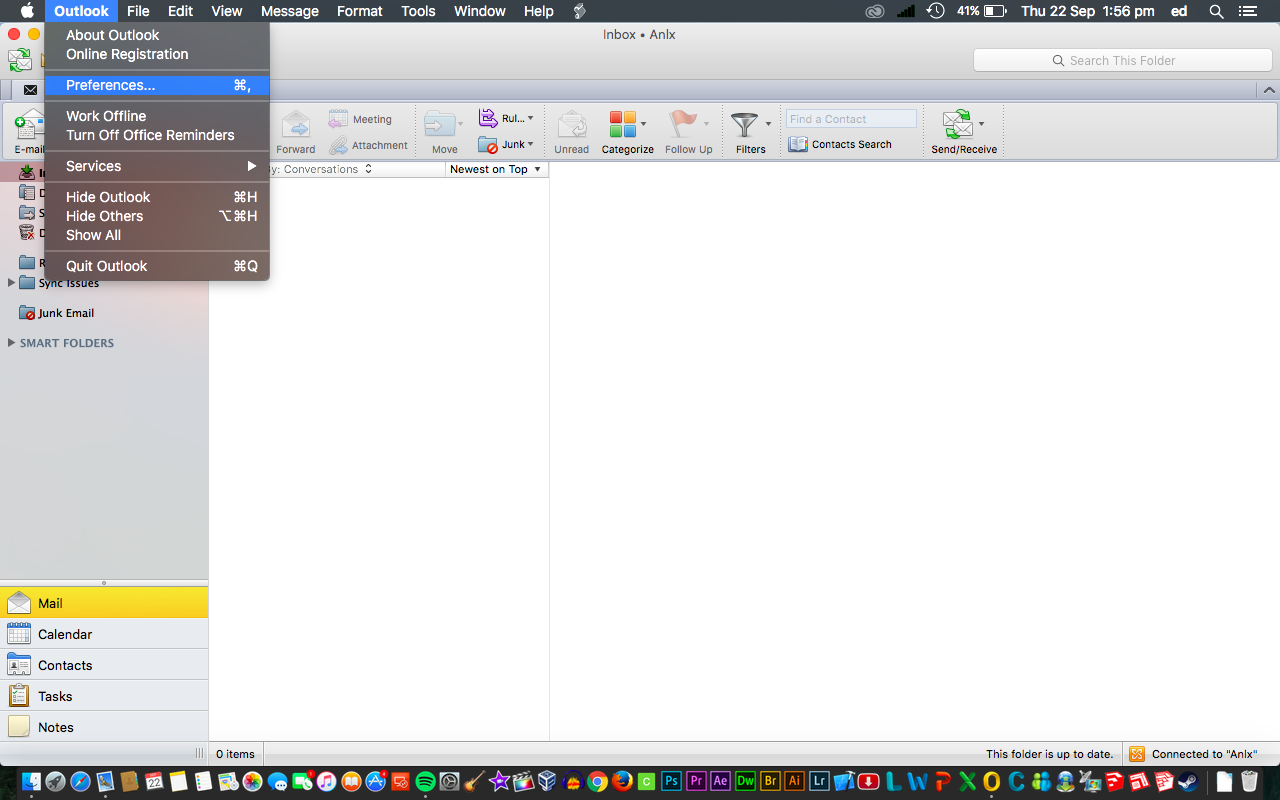
4.In preferences, click “Accounts”
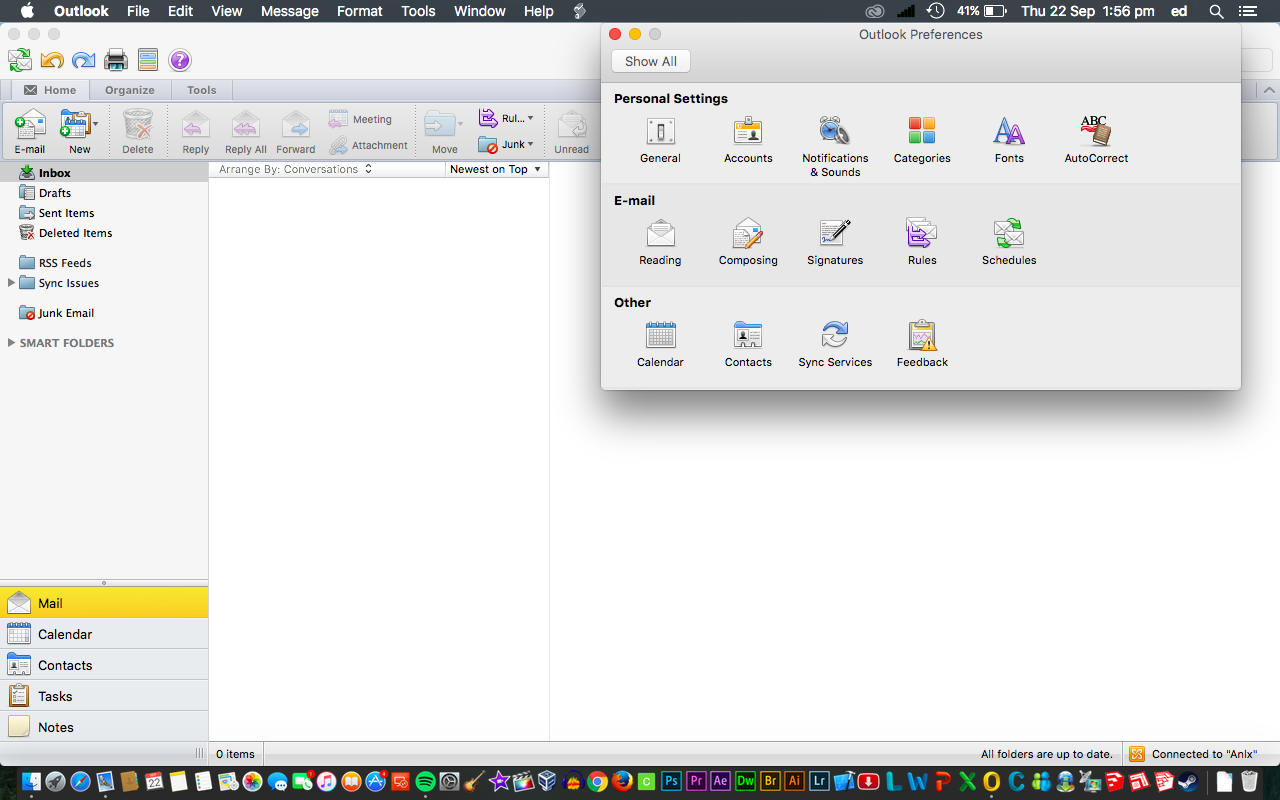
5.Click “Exchange account”
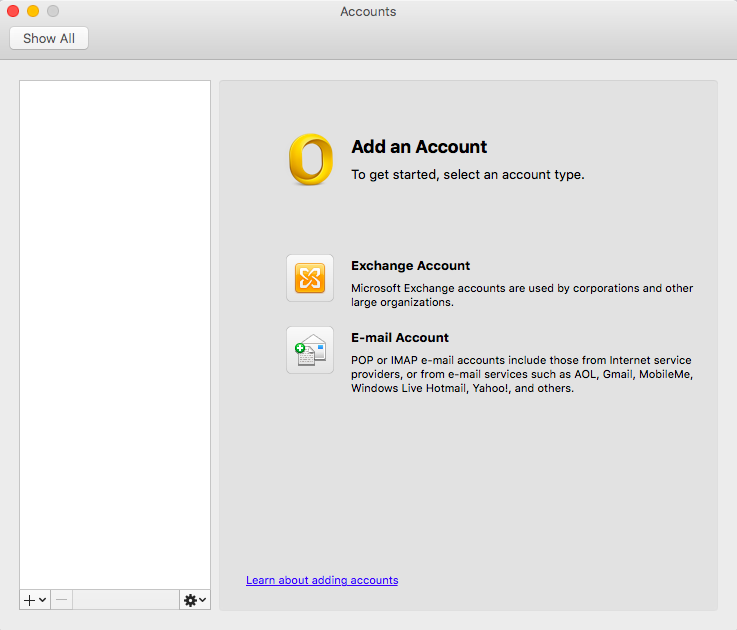
6.Now insert this information into the fields:
E-mail address: your email
Method: User Name and Password
User Name: your email
Password: your password
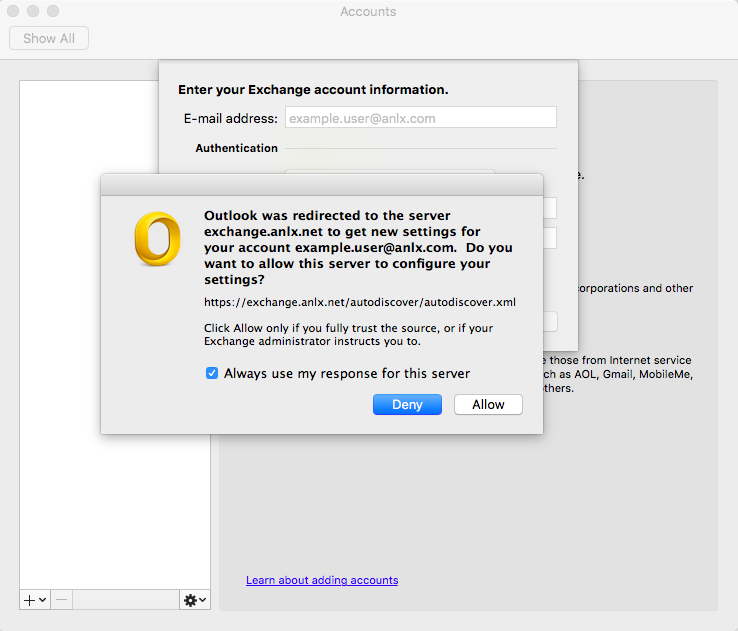
Then click “Add Account”

7.Click allow and you are done.
- Windows 7/8/10 Live Mail
- Windows 10 Mail (POP3)
- Windows 10 Mail (IMAP)
- Windows Mail Exchange
- Thunderbird (POP3)
- Thunderbird (IMAP)
- Outlook 2016 (POP3)
- Outlook 2016 (IMAP)
- Outlook 2016 (Exchange)
- Outlook 2013 (IMAP/ POP3)
- Outlook 2013
- Outlook 2010 (IMAP/ POP3)
- Outlook 2010
- Outlook 2011 Mac
- Mac Mail (POP3)
- Mac Mail (IMAP)
- Mac Mail (Exchange)
- IOS 10 (Exchange)
- IOS 7 (POP3)
- IOS 7 (IMAP)
- IOS 7 (Exchange)
- Android (IMAP)
- Android (POP3)
- Android (Exchange)
Windows Live Mail
1.First open the start menu by clicking the windows icon in the bottom left hand corner of the screen, and type “Windows Live Mail”
2.From windows live mail click on the top left drop down button.
3. Now select the “Options” tab and then go to “Email accounts”
4. Now click on the “Add” button
5. “Email Account”
6. Now type in the required intimation into the fields:
Email Address: your email
Password: your password
Display name for your sent messages: your name
7. Incoming server information
Server type: POP
Server address: pop3.anlx.net
Port: 110
Log-on username: firstname.lastname
Outgoing server information
Server address: smtp.anlx.net
Port: 465
Make sure both “Requires a secure connection (SSL)”, and “Requires authentication” are both ticked
Then click “Next” and “Finish” to complete the setup.
Windows 10 Mail (POP3)
1. To open Mail, first click the windows icon in the bottom left hand corner to bring up the start menu, and type “Mail”
2. In the mail app click the settings icon on the bottom left of the screen.
3. Click “Manage accounts”
4. Now click on “Add Account”
5. Then “Other Account”
6. Now pick the “Internet email” option
7. Finally fill in the following fields with the required information:
Internet Email Account: your email
Username: your email
Password: your password
Account name: something you will recognise as this account
Send your messages using this name: your name
Incoming email server: pop3.anlx.net
Account Type: POP3
Outgoing (SMTP) email server: smtp.anlx.net
Make sure the following boxes are ticked: Outgoing server requires authentication/ use the same username and password for sending emails/ Require SSL for outgoing emails
Windows 10 Mail (IMAP)
1.First open the start menu by clicking the windows icon in the bottom hand left corner of the screen, and type “Mail”, then press enter or click on the mail icon
2. Then, in the bottom left corner, click the small settings icon.
3.Then in mail settings, click “Manage accounts”
4.Now click “Add account”
5. Click “Other Account”
6. Now select “Internet email”
7. Now fill in the following fields with this information:
Email address: your email
Username: your email
Password: your password
Account name: something you will recognise as this account
Send your messages using this name: your name
Incoming email server: imap.anlx.net
Account Type: IMAP4
Outgoing (SMTP) email server: smtp.anlx.net
Make sure theses boxes are ticked: Outgoing server requires authentication/ Use the same username and password for sending emails
Windows 10 Mail (Exchange)
1. First open the start menu by clicking the windows icon in the bottom left corner of the screen and type “Mail”
2. Now click the little settings icon in the bottom left hand corner
3. In the settings tab, click on “Manage Account”
4. In the Manage account tab, select “Add Account”
5. Click “Add Account”
6. Now click “Exchange”
7. Now click “Exchange ActiveSync”
8. Now fill in the following information to the fields:
Email Address: your email
Password: your password
Username: your email
Server: exchange.anlx.net
Tick “Server requires encrypted (SSL) Connection
Account Name: a name you will associated with this account
Thunderbird (POP3)
1. Open the start menu by clicking the windows icon on the bottom left of the screen, and type Thunderbird
2. In Thunderbird, click on email
3. Now click “Skip this and use my existing email”
4. Now enter your account info:
Your Name: your name
Email Address: your email
Password: your password
“Continue”
5. Now fill in the following fields:
Incoming: Pop3
Server hostname: pop3.anlx.net
Port 110
SSL: none
Authentication: AutoDetect
Outgoing: SMTP
Server hostname: smtp.anlx.net
Port: 465
SSL: SSL/TLS
Authentication AutoDetect
Username Incoming: example.user
Username Outgoing: example.user
Now click “I understand the risks” and click Done
Thunderbird (IMAP)
1. Open the start menu by clicking the windows icon on the bottom left of the screen, and type Thunderbird
2. In Thunderbird, click on email
3. Now click “Skip this and use my existing email”
4. Now enter your account info:
Your Name: your name
Email Address: your email
Password: your password
“Continue”
5. Now select: IMAP
Then “Manual Config”
6. Now please fill in the fields:
Incoming: IMAP
Server hostname: imap.anlx.net
Port: 143
SSL: STARTTLS
Authentication: Normal Password
Outgoing: SMTP
Server hostname: smtp.anlx.net
Port: 465
SSL: SSL/TLS
Authentication: Normal Password
Username Incoming: example.user
Username Outgoing example.user
Now select “Done”
Outlook 2016 (POP3)
1. First open the start menu, by clicking the windows icon in the bottom left hand corner on the screen, and type “Outlook”
2. In Outlook, at the top left, click “File”, then under account infomation, click “Add Account”
3. Now select “Manual setup or additional server types” and click next
4. Select “POP or IMAP”
5. Now enter the following infomation into the fields:
Your Name
Your Email Address
Account Type: POP3
Imcoming Mail Server: pop3.anlx.net
Outgoing Mail Server: smtp.anlx.net
User Name: Your Email Adress
Password
Click ‘Next’
6. Click ‘Finish’
Outlook 2016 (IMAP)
1. First open the start menu, by clicking the windows icon in the bottom left hand corner on the screen, and type “Outlook”
2. In Outlook, at the top left, click “File”, then under account infomation, click “Add Account”
3. Now select “Manual setup or additional server types” and click next
4. Select “POP or IMAP”
5. Now enter the following infomation into the fields:
Your Name
Your Email Address
Acount Type: IMAP
Incoming Mail Server: imap.anlx.net
Outgoing Mail Server: smtp.anlx.net
User Name: your email
Password
Click ‘Next’
6. Click Finish
Outlook 2016
1.Open the start menu by clicking the windows icon in the bottom left Corner of the screen and type “Outlook”
2. click “File” on the top left hand corner of the screen
3. click the “Add Account” button underneath Account Information
4.Click the “E-mail Account” box and fill on the required fields:
Your Name
Email Address
Password
5. click “allow”
6. click “Finish” to complete the setup
Outlook 2013 (IMAP/ POP3)
1. First open the start menu, by clicking the windows icon in the bottom left hand corner on the screen, and type “Outlook”
2. In Outlook, at the top left, click “File”, then under account infomation, click “Add Account”
4. Now enter the follwing infomation
Your Name
Your Email Adress
Password
Click Next
Click Finish
Outlook 2013
1.Open the start menu by clicking the windows icon in the bottom left corner, and type “Outlook”
2.Click “File” which is in the top left corner.
3. Click “Add Account” underneath “Account Information”
4. Make sure “Yes” is selected and then click “Next”
5. Now fill in the fields with the following details:
Your Name
E-Mail Address
Password
Then click “Next” and “Finish”
Outlook 2010 (IMAP)
1. First open the start menu, by clicking the windows icon in the bottom left hand corner on the screen, and type “Outlook”
2. In Outlook, at the top left, click “File”
3. Under account infomation, click “Add Account”
4. Now enter the follwing infomation
Your Name
Your Email Adress
Password
Click Next
Click Finish
Outlook 2010
1.Open the start menu, using the small windows icon in the bottom left hand corner, and type “outlook”. Then push the enter key if you see this icon
2. Click the “file” button in the very top left, then “add account”.
3. Now fill in your info into the fields:
Your name: your first and last name
Email Address: your email address
Password: your password
Then select the next button
4. Click “finish” and then you’re done
Outlook 2011 Mac
1.From the desktop click the small magnifying glass in the top right of the screen
2.When this box appears type “Outlook”
3.Now click the “Outlook” tab on the left and then go to “Preferences”
4.In preferences, click “Accounts”
5.Click “Exchange account”
6.Now insert this information into the fields:
E-mail address: your email
Method: User Name and Password
User Name: your email
Password: your password
Then click “Add Account”
7.Click allow and you are done.
Mac Mail (POP3)
1.From the desktop open “Mail” from the left hand side of the dock
2.Go to “Mail”, and click “Add Account”
3.Select “Other Mail Account”
4.Now fill in the information into the fields:
Name: Your name
Email Address: your email address
Password: your email password
5.Now these fields:
Email Address
Password
Account Type: POP
Incoming mail server: pop3.anlx.net
Outgoing mail sever: smtp.anlx.net
Then “Sign in”
6.Then select “Mail” and click “Done”
Mac Mail (IMAP)
From the desktop open “Mail” from the left hand side of the dock
Go to “Mail”, and click “Add Account”
Select “Other Mail Account”
Now fill in the information into the fields:
Name: Your name
Email Address: your email address
Password: your email password
Now these fields:
Email Address
Password
Account Type: IMAP
Incoming mail server: imap.anlx.net
Outgoing mail sever: smtp.anlx.net
Then “Sign in”
Then select “Mail” and click “Done”
Mac Mail (Exchange)
From the desktop open “Mail” from the left hand side of the dock
Go to “Mail”, and click “Add Account”
Select “Exchange” and press “Continue”
Now enter these details in the fields:
Name: Your Name
Email Address: your email address
Password: your password
Now enter these details in the fields:
Email Address: your email
User Name: your email again
Password: your password
External URL: exchange.anlx.net
Then click “Sign in”
Now select all the option other than “Notes” then click “Done”
IOS 10 (Exchange)
1.From the settings App, tap on “Mail”
2.In the mail page, select “Accounts”
3.Now select “Add Account”
4.Select “Exchange”
5.Now please fill in the following fields:
Email: your email address
Password: your password
Description: something you will recognise as this account
6.Now you can select what to sync from your email account to your device, it is usually:
Contacts
Calendars
Reminders
(not notes)
Then select “Save”
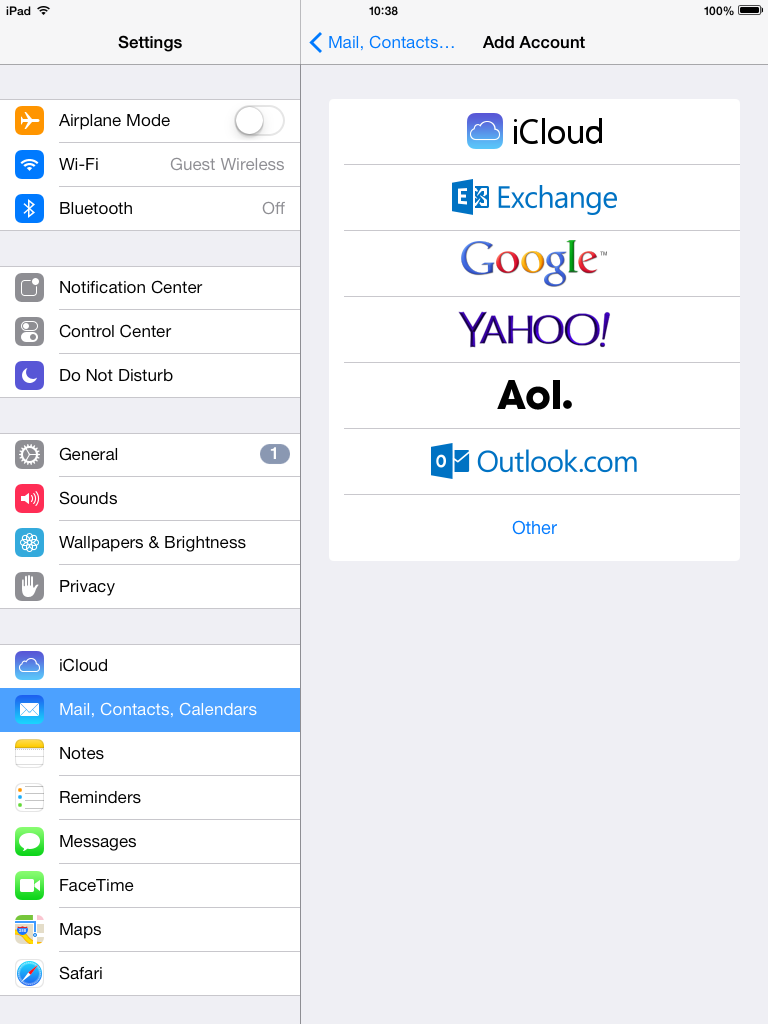
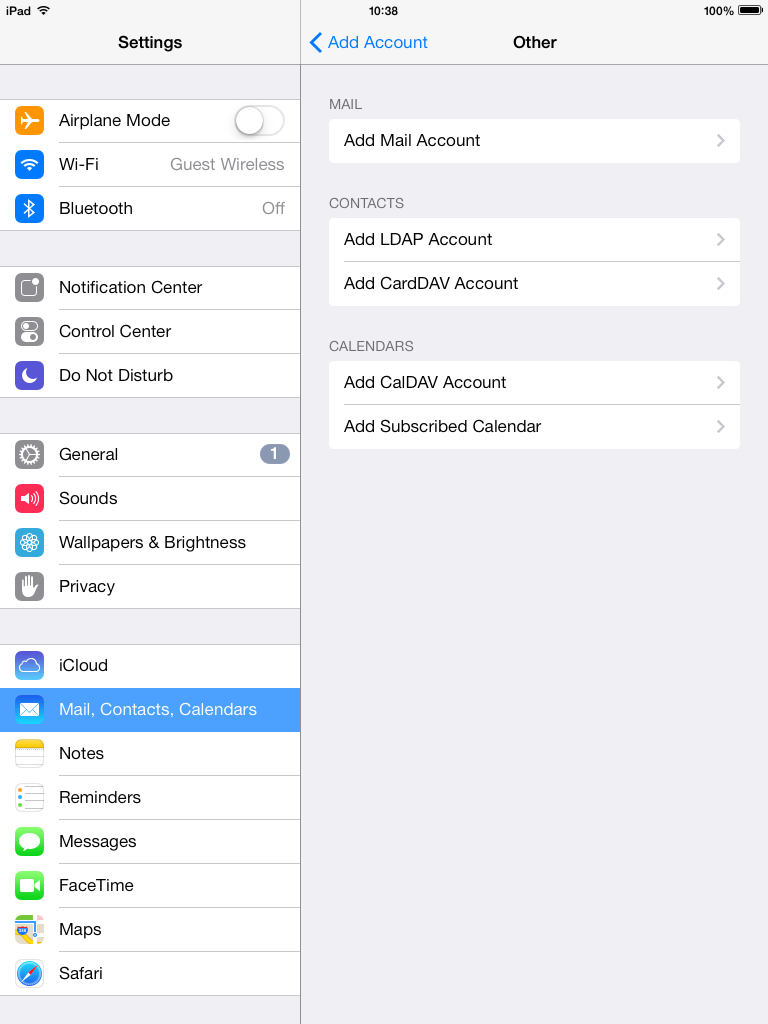
IOS 7 (POP3)
1.From the home screen, tap the settings icon
2.Select the “Mail, Contacts, Calendars tab on the left hand side.
3.Click the “Other”, button on the bottom of the list
4.Now select the “Add Mail Account” option at he top of the screen
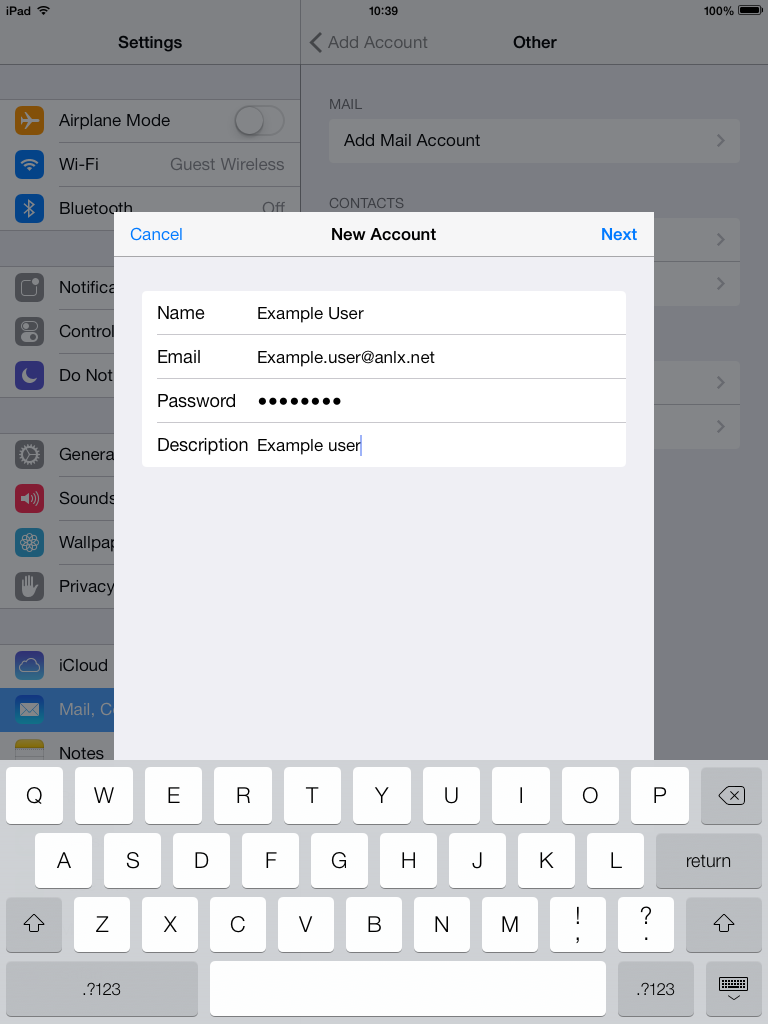
5.Now please enter these details into the fields:
Name
Email: your email
Password: your password
Description: something you will remember to identify this account
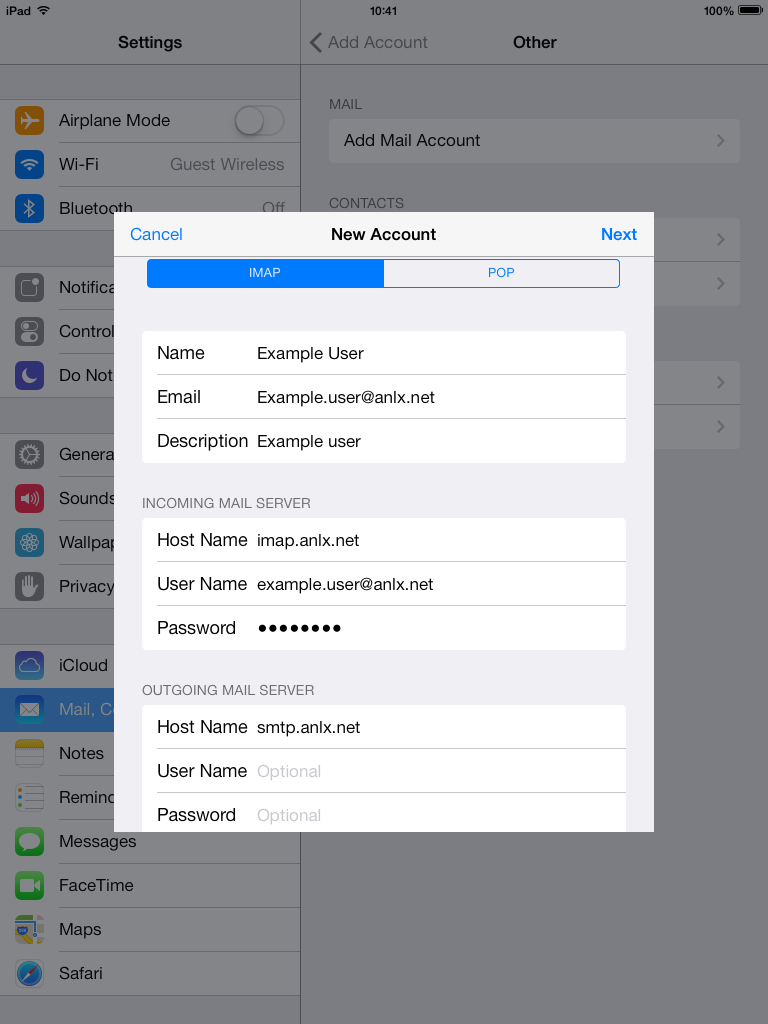
6. Now enter these details:
Host name: pop3.anlx.net
User name: your email address
Host name (outgoing): smtp.anlx.net
IOS 7 (IMAP)
1.From the home screen, tap the settings icon
2.Select the “Mail, Contacts, Calendars tab on the left hand side.
3.Click the “Other”, button on the bottom of the list
4.Now select the “Add Mail Account” option at he top of the screen
5.Now please enter these details into the fields:
Name
Email: your email
Password: your password
Description: something you will remember to identify this account
6.Now enter these details:
Host Name: imap.anlx.net
User Name: your email
Host Name (outgoing): smtp.anlx.net
IOS 7 (Exchange)
1.From the home screen, tap the settings icon

2.Select the “Mail, Contacts, Calendars tab on the left hand side.
3.Select the exchange button second down in the list.
4.Now put in the details to the select fields:
Email Address: your email
Password: your password
Description: something you will recognize as this account
5.Now put all the following settings to the ON position:
Contacts
Calendars
Reminders
6.Finally click “Save” and you’re finished.
Android (IMAP)
On your devices home screen tap the app tray icon.
From the App tray, tap on the email icon on the left hand side of the screen
In the email app, please fill in the ‘Email address’ and ‘password’ fields with your information then select ‘next’
Select the “IMAP” button
Please fill in these fields with this information:
Username: your email
IMAP server: imap.anlx.net
Security type: None
Port: 143 (this should be default)
Then press “next”
Outgoing Server Settings:
SMTP server: smpt.anlx.net
Security type: SSL/TLS (accept all certificates)
Port: 465
Require sign in: Yes
Username: Your Email address
Password: Your Password
Inbox checking Frequency: Every 15 minuets
Make sure that these fields are checked yes:
- Notify me when email arrives
- Sync email from this account
- Automatically download attachments when connect to Wi-Fi
Give this account a name, this should be something you meaningful
Your name: this will be displayed on outgoing messages
Android (POP3)
1.On your devices home screen tap the app tray icon
2. From the App tray, tap on the email icon on the left hand side of the screen
3. In the email app, please fill in the ‘Email address’ and ‘password’ fields with your information then select ‘next’
Select the “POP3” button
Please fill in these fields with this information:
Username: Email address
Password
POP3 Server: pop3.anlx.net
Security Type: None
Now fill out the outgoing server settings:
SMTP server: smtp.anlx.net
Security Type: SSL/TLS (accept all certificated)
Port: 465
Now make sure that the inbox check frequency is set to 15 minutes, “Notify me when email arrives”, and “Sync email from account” are both checked. And press next
Now give this account a name, for example: Work Email
Then enter your name
To finish press next.
Android (Exchange)
1.On your devices home screen tap the app tray icon
2. From the App tray, tap on the email icon on the left hand side of the screen
3. In the email app, please fill in the ‘Email address’ and ‘password’ fields with your information then select ‘next’
4. Select the “Exchange” button
5.Please fill in the fields with this information
Domain: Your Email
Server: exchange.anlx.net
Make sure to have “Use secure Connection (SSL)”, and “Accept all SSL certificates” enabled
6.In the “Account option” page, make sure all these options are selected
- Notify me when email arrives
- Sync contacts from this account
- Sync calendar from this account
- Sync email from this account
- Automatically download attachments when connected to Wi-Fi
Then select the next button
7.Finally, you need to give you email account a name, ideally something you will recognize, and then select next.